16 February, 2024

Wooly Whales: A sparkling review of Joe’s Toes Slipper Kit

2024-02-16T17:57:34-06:00Embroidery, Weaving, Felting & FIbers|2 Comments

Sometimes the random things that pop up in your Instagram feed turn out to be something awesome. I spotted this slipper kit from Joe’s Toes while I was randomly scrolling a few evenings ago. I had been looking for a new pair of slippers after some sheepskin ones I ordered last fall turned out to be really uncomfortable. A kit sounded like fun!

I picked out the turquoise and teal kit and the description said I could customize it, so I requested the dark teal color for the uppers and green thread instead of rainbow. I knew I wanted to embroider or add something to the tops of them, but I didn’t have a plan when I picked out the kit.

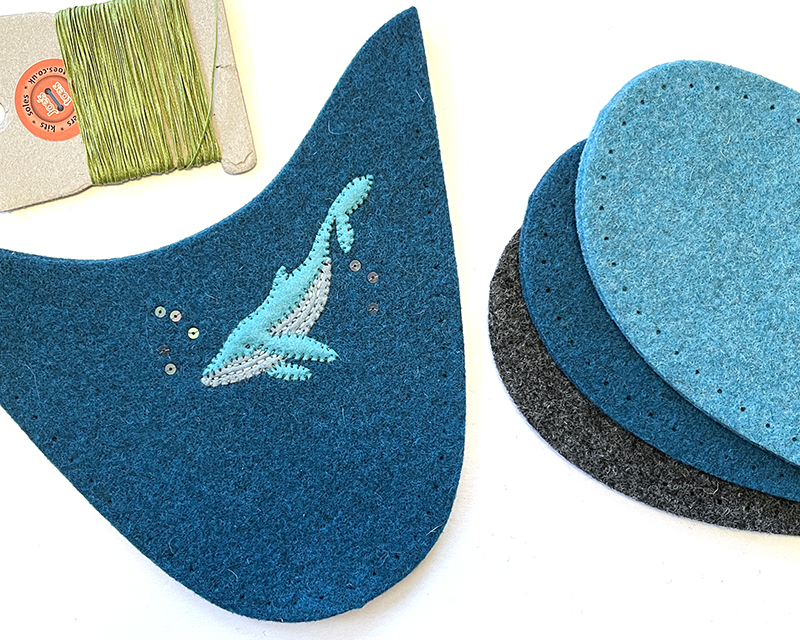
The kit comes with pre-punched wool felt pieces for the upper, three layers for the soles, and the thread for stitching them together. You can choose from several options for the bottom layer or outsole. I picked the felt with latex, which is great on my hardwood floors and so far it’s not slippery at all.

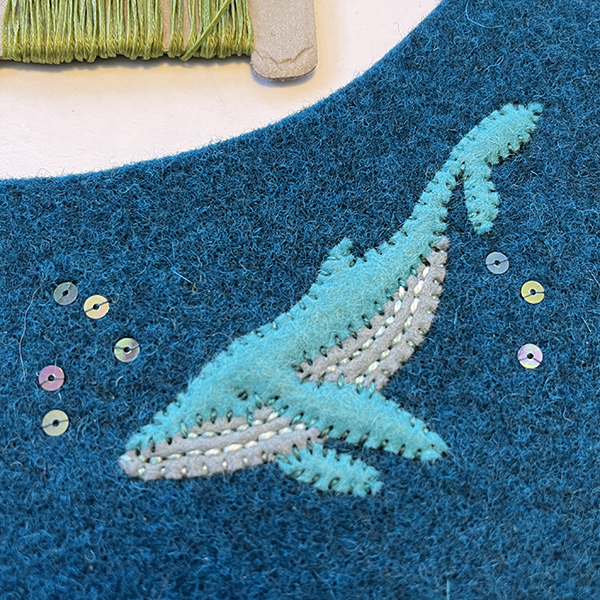
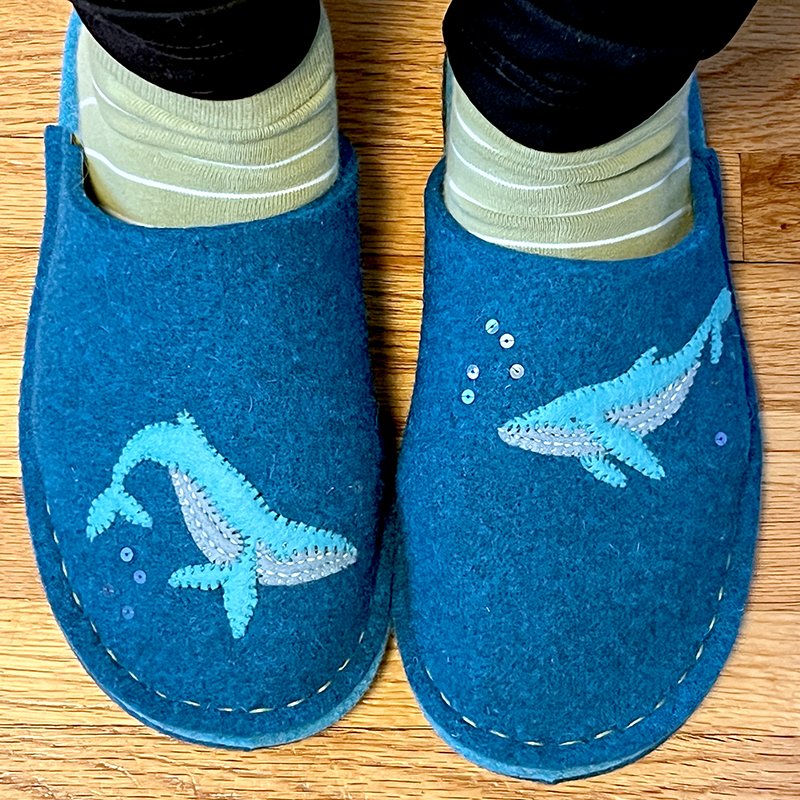
I decided that I needed to stitch something fun on the uppers and after a little brainstorm my mom suggested humpback whales, which sounded really fun! So I dug through my stash of wool/rayon felt scraps and picked out a turquoise and blue-grey (peacock and pewter from Benzie Design) and some size 8 perle cotton. Even though the felt slipper pieces are about 3/16th inch thick, they are super easy to stitch into. I drew the whales onto some freezer paper so I could cut out all the little details easily. I basted them onto the uppers with a little glue stick. Once I had stitched around the whales, I added a few transparent sequins to add some sparkly bubbles.

I read through all of the instructions to assemble the slipper pieces and they offer a video, but I didn’t feel like I needed it. They have a couple of clever little notches that help you line up everything. Although they suggest using a backstitch to put everything together, which I’m sure works great, I decided to go with a double running stitch because I thought it would be a little neater on both the top and bottom.

These were so much fun to stitch! The pre-punched holes make it really easy even though you are stitching through four thick layers. I couldn’t wait to try them on.

Overall, the kit was packaged nicely, the instructions are great, the materials are super nice, and it shipped fast. I loved that I could customize it to the colors I wanted. I am just delighted with the results!

23 June, 2015

Footpath and the Midwest Weavers Conference

2015-06-23T11:54:43-05:00Gallery Exhibitions, Out & About, Weaving, Felting & FIbers|Comments Off on Footpath and the Midwest Weavers Conference

footpath

Footpath.  The design for this moebius scarf was inspired by one of the patterns in the WGM’s 75th Anniversary “A Thread Through Time” book.  I used the basketweave tie up pattern on page 56 and translated it into a colorful geometric design, created with bits of colored and patterned paper pulled from junk mail and catalogs.  I assembled the geometric design, scanned it and created a seamlessly repeating pattern that was digitally printed on to fabric.

This last week was the Midwest Weavers Conference here in Minneapolis.  This is a regional conference hosted every other year in a different city.  Our local Weavers Guild were the hosts for the conference and I was asked to teach two technology classes as part of conference seminars, one about marketing yourself online and one about photo editing.  The piece above was my submission to the Instructors Exhibit.  Since I am only a little bit of a weaver, I didn’t want to have my little pieces on display with the masters, so I decided to go with what I am good at, but with a weaving twist.

Screen Shot 2015-06-23 at 11.40.20 AM

Our Weavers Guild is celebrating their 75th birthday this year.  As part of the celebration, they put together a book.  For years, as I understand it, the guild newsletter included a weaving draft and a tiny swatch of fabric made by volunteers, so in each newsletter, you not only got the pattern, but an example as well.  For their birthday, they pulled drafts from the archives and had guild members make contemporary pieces based on those designs and they put it altogether into a book.  So I decided to do the same, but with my twist.  So, I used the tie up pattern from a basketweave draft and translated it into color.  The design was made with paper punches and recycled paper from junk mail, receipts, newspaper and an Art-A-Whirl catalog glued to a piece of black card stock.  I call it Footpath because the tie up pattern is the part of the draft that tells you how to tie up the treadles, which are the pedals you control with your feet when you are weaving on a floor loom.  So I made this design into a piece of fabric and stitched a cowl scarf to be a part of the exhibition.  I love that it is fun and bright; I think I might keep this one for myself.  I didn’t get a photo of the finished piece, but that is the printed fabric in the top photo.

The conference was awesome!  I volunteered for several days at the Guild to help with their fiber shop and I taught two classes with really wonderful groups of students from all over the country.  I met a lot of cool people and the sense of fun and enthusiasm throughout the conference was infectious.  Everyone seemed to be really enjoying everything about it.  I am so glad that I was invited to be there.  Thanks to the organizers, advisors, attendees and volunteers who made it great!

15 June, 2015

I’ve got T-shirts!

2015-06-15T14:46:12-05:00Everything Else, Sewing & Design, Weaving, Felting & FIbers|2 Comments

Screen Shot 2015-06-15 at 2.29.22 PM

Today is the day!  I am launching a brand new line of designs printed on t-shirts and coffee mugs.  I took some of my most popular 1 inch button designs with fiber art puns and have turned them into t-shirt designs.  These are printed by a company called RedBubble on a variety of different t-shirts.  You choose the design, size, style and color and they will print and send it to you.  There are a lot of different companies that will do this, but I like the selection at RedBubble and their customer service is totally top notch. I have several t-shirts from RedBubble designed by other artists and I just got my own “Knit Long and Prosper” shirt to celebrate my own new designs.  These have been SO FUN to design and I am planning to keep adding more.  (Let me know if you have a special request!)

I am featuring my “Reed Me” design in this post to celebrate the first day of the Midwest Weavers Conference here in Minneapolis.  I did a volunteer shift for the conference this morning and I am teaching some workshops on Saturday.  I wanted to time the opening of this new online shop so that I can talk about it in my “Marketing Yourself Online” class at the conference as another way of having your work for sale by making coffee mugs or notecards or even t-shirts with images of your work.

Screen Shot 2015-06-15 at 2.21.54 PM

Screen Shot 2015-06-09 at 9.16.14 AMI have added a link in the sidebar (over there to the right) so that you can always find your way to my shop from here, or you can search at RedBubble under “beckarahn”.


8 June, 2015

Attention Fiber Geeks: Amplify your Art

2015-06-08T15:18:31-05:00Classes & Teaching, UpcomingClasses, Weaving, Felting & FIbers|Comments Off on Attention Fiber Geeks: Amplify your Art

This week I am teaching a class at the Weavers Guild of MN called “Amplify your Art”.  It started as a question: “Could you teach a class about soft circuits?”  My answer to that was “No, not really.  But what I can do…”

Part demonstration, part inspiration. This session will give you dozens of ideas for how to incorporate technology into your fiber art projects. We’ll cover a range of techno-possibilities, from electronic components like LED’s and conductive threads; to digital, 3-D printing and laser cutting; to chemistry with thermochromic and phosphorescent paints. Becka will show samples, provide sources, and do short demos to show how you can incorporate technology of all kinds into your weaving, spinning, and sewing projects. Thursday, June 11: 6:00-9:00 P.M.

I’m not really an expert in soft circuits.  I have built a couple.  I get the gist of it.  But I decided to take the incorporating technology theme of the class and run with it.  Because that I do know a lot about.

George (up there in the video) is made with a little traditional wiring (in the box) and some felt beads and conductive thread.  He’s really friendly, but a little shy.  If you hold hands with him, his nose lights up.  We will talk about how he is made.  I have also made three really fun examples with thermochromic pigment.  That means it changes color when you change the temperature.  I have an embroidered elephant embellished with LEDs.  I also have some UV reactive yarn.  We are going to make some sticker circuits in class. That’s right a little hands-on fun!  We will watch some videos of other artists doing cool stuff.  We will talk about 3-d printing and laser cutting and digital fabric printing and what works and what doesn’t and where to get it.  It will be 3 hours of discussing, exploring and getting inspired.

There are still spaces available if you want to join us.  You can register online or call the guild.  If you are interested and can’t make it to class, I have collected a whole bunch of articles about how fiber artists are using all kinds of technology in their art.  I will post those here after class so you can join in the reading if you are interested.

Do you have any really great examples of technology intersecting with fiber art?  Share in the comments and I will add them to my resource list.


6 June, 2014

Bias Plaiting Baskets

2014-06-06T15:46:05-05:00Classes & Teaching, Weaving, Felting & FIbers|Comments Off on Bias Plaiting Baskets

imageI spent a truly delightful weekend taking a workshop from the very talented Jackie Abrams.  Textile Center had Jackie come to teach a 2 1/2 day class on bias plaited baskets.  I am not a basketweaver, in fact, I had only ever made one basket before I took this class.  This gave me a rating of “0” on my name tag at the start of class.  There were several of us “zeroes” in class and although we were the total beginners, I never felt like I was struggling to keep up even though there were “fives” in the room, a credit to Jackie’s teaching style.  I took the class on a whim.  Jackie was organized and thoughtful and just lovely to email back and forth with while I was setting up the class (so I knew I would like her) and it has been a challenging spring for me creatively and I thought this would be a great jump start.  I am so glad I did.

image

Bias plaiting works on the bias.  You weave the base, over-under-over-under, and it looks just like a flat paper coaster.  It reminded me a lot of the woven paper placemats I have made with kids.  The bias comes in when you start to shape and you do that by bending things on the diagonal.  It was tough to get the hang of at first and I really forgot what it is like to be a beginner at something totally new.  It’s sort of rare that I jump into something that I don’t have a little experience with.  After wrestling with my first corner, I watched Jackie demonstrate again and it surprised me how much more it made sense the second time.  It also took me a little while to make the connection that I was working with the bias of a woven “fabric”, which stretches and compresses does all kinds of crazy things.  Once I remembered “oh yes, bias” and realized that I could boss the paper around a bit more, then things started to click.

imageOur material was painted watercolor paper, which is a lovely thing to work with. It’s thick paper which is hard to crease (which is a good thing) and is much less fragile than I had at first thought it would be.  We painted each sheet of paper on both sides because in this basket, you end up seeing both sides (and the contrasting colors are a huge help in remembering what piece to put where.)  Painting was fun because really anything goes and some of the wildest papers made some really great baskets.  We cut it into 1/4 inch strips using a pasta machine.  (Brilliant!)

You sculpt your flat paper by adding corners which change the direction and shoulders which are decreases (like k2tog for those knitters reading along).  Some of the class members went for asymmetrical sculptural pieces.  I (being a zero) decided that I would rather get a little practice with the classic symmetrical shapes first, so I made two different baskets in class: a “kimono” and a “pillow”.

image

image

The little clippies come from the electronics department at Radio Shack.  You should have seen the look on the face of the teenaged boy at the counter who asked me what project I was working on.  Basketmaking?  Priceless.

image

image


image

image

image


10 October, 2013

Exquisite Trims: Passamaneria Valmar, Florence Italy

2013-10-10T14:22:48-05:00Everything Else, Weaving, Felting & FIbers|Comments Off on Exquisite Trims: Passamaneria Valmar, Florence Italy

ribbon

The Passamaneria Valmar is a tiny gem of a shop that carries an amazing selection of specialty trims.  Ribbons, cording, tassels, fringe – you name it and they have some.  The shelves literally go from floor to ceiling.  (Be sure to click on these panorama shots to see them larger in more detail.)  The shopkeeper and I didn’t have a lot of vocabulary in common, but when he saw the kinds of ribbons I was admiring, he started pulling out the ones that he thought were real treasures.  The two pieces I got he tells me were woven in Florence in the 50’s.

photo(5)Both are woven from silk and metallic threads (each is about 1.5 inches wide)  The blue and silver one is very shimmery and the cords on the black and brown one are thick silk cords that are couched on the top of the weave.  They are beautiful pieces and the photo doesn’t do justice at all to the rich colors (silk is too shiny to photograph well.)

ribbon-2

Go to Top