23 August, 2017

Try it: Spoonflower’s Fill-a-Yard tool and 8-bit Art

2017-08-23T12:39:33-05:00Spoonflower & Fabric Design, Tutorials|Comments Off on Try it: Spoonflower’s Fill-a-Yard tool and 8-bit Art

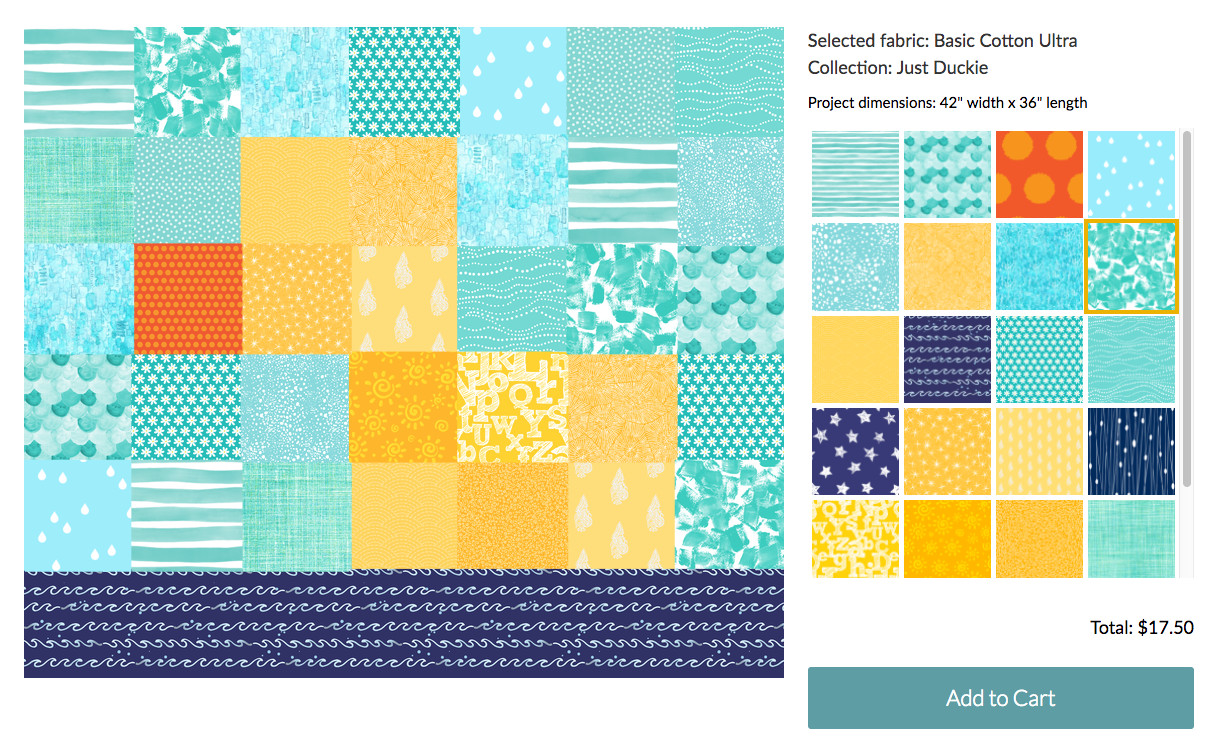
Spoonflower has a new Fill-A-Yard tool. It’s very simple to use.

  • Create a collection of fabrics.
  • Choose a template (this is 1 yard with 6 inch squares).
  • Click the fabric you want from the thumbnails on the right, then click the square you want to fill with the fabric design.
  • It will print as a “cheater quilt” as one piece of fabric with this design of squares filled with other designs.

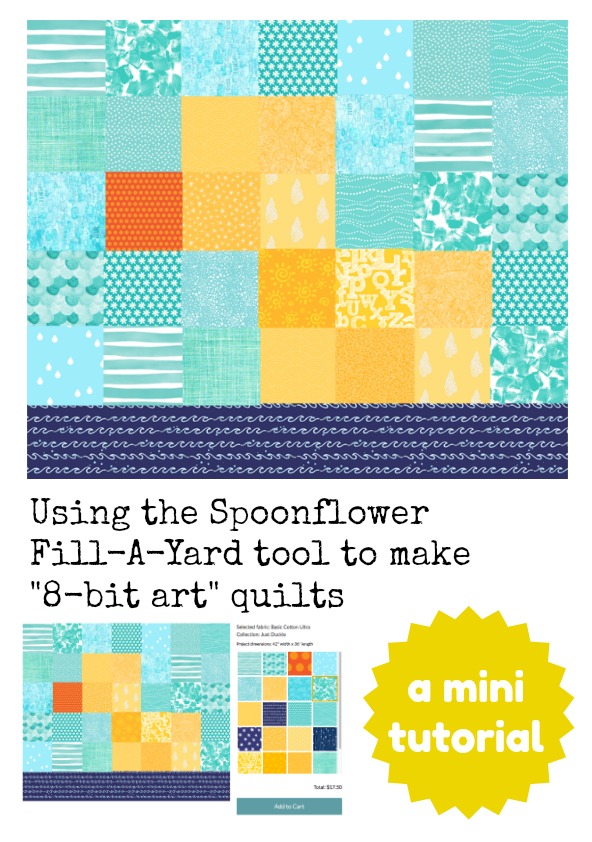
As I was demonstrating this for a class a few days ago I suddenly had a brainstorm: I wondered if I could make a picture. It would have to be something ultra simple like 8-bit art (think PacMan or Space Invaders) because there aren’t very many squares to work with. So this morning, I collected a bunch of fabrics to try making a rubber ducky. Here’s my rubber ducky quilt. I think it’s pretty charming and it would make a sweet baby gift.

Want to see how it works? You can try this out with the Just Duckie collection of fabrics I put together. From that collection, just click where it says “Want to use this collection for a Fill-A-Yard project? Start Designing”.

What else can you “draw” using just 42 squares? I’d love to hear about it!

11 August, 2017

Fabric Design for Back to School: Pop Art Shoe Bag Tutorial

2017-08-11T08:17:10-05:00Everything Else, Freebies & Patterns, Spoonflower & Fabric Design, Tutorials|3 Comments

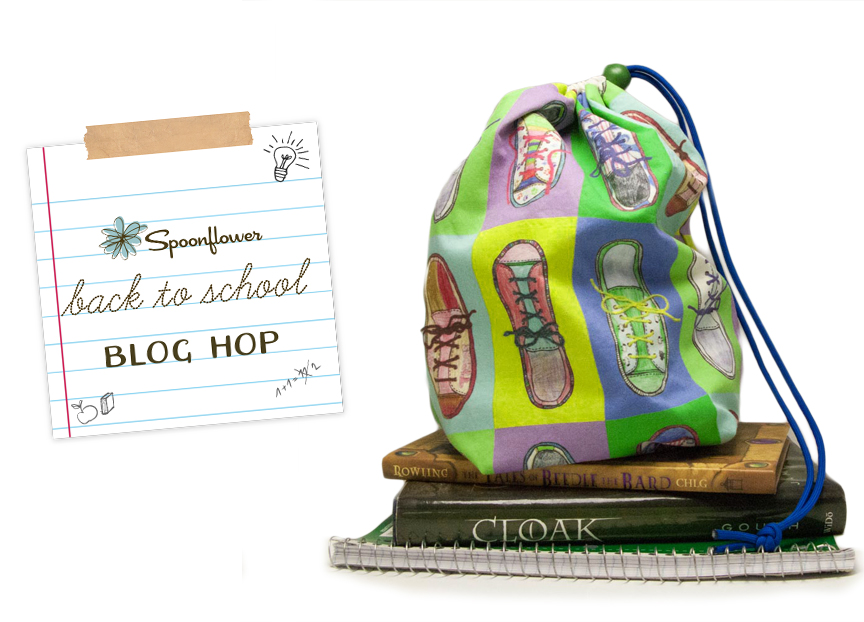
When you live in Minnesota, “Back-to-School Season” is quickly followed by “Snowboots Season”. When I asked my sister what she thought would be a great back-to-school project to share with the Spoonflower Back to School Blog Hop, she described a “stuff sack” type bag to put the kids’ shoes in their backpacks when they have to wear their snowboots to school. Something to keep the papers from getting dirty and books from getting crumpled by dirty sneakers. With each kid needing regular shoes, gym shoes and snowboots, there are a lot of shoes getting hauled back and forth on the bus every day.

Creating the fabric design.

Color & scan.

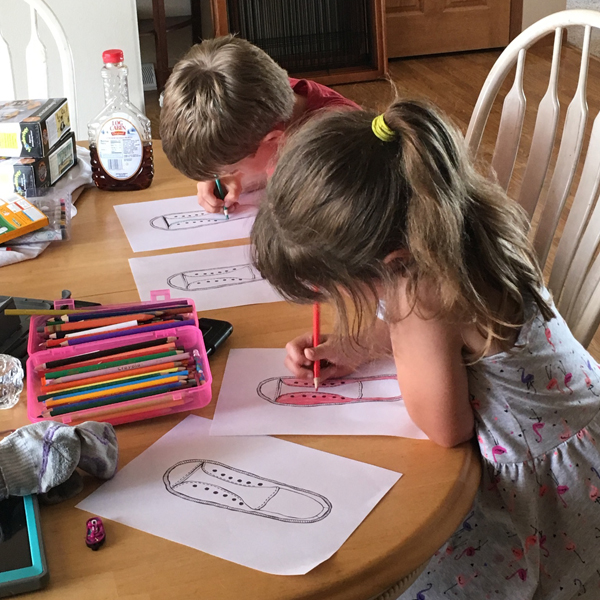
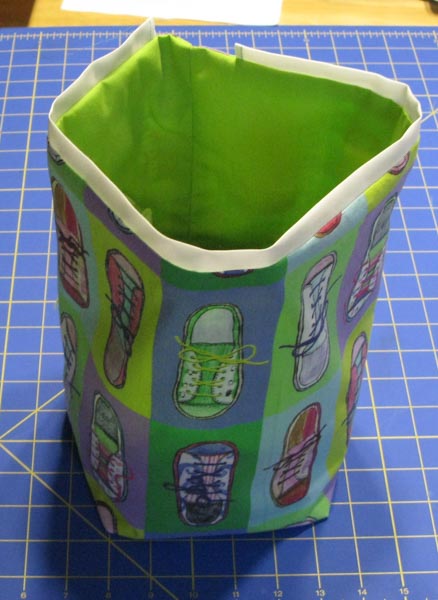
My niece and nephew are 7 & almost 9 years old and I thought the bags would be the most fun (and more likely to get used) if I could get the kids to help me with the fabric design. What better for a shoe bag than a fabric print with shoes?

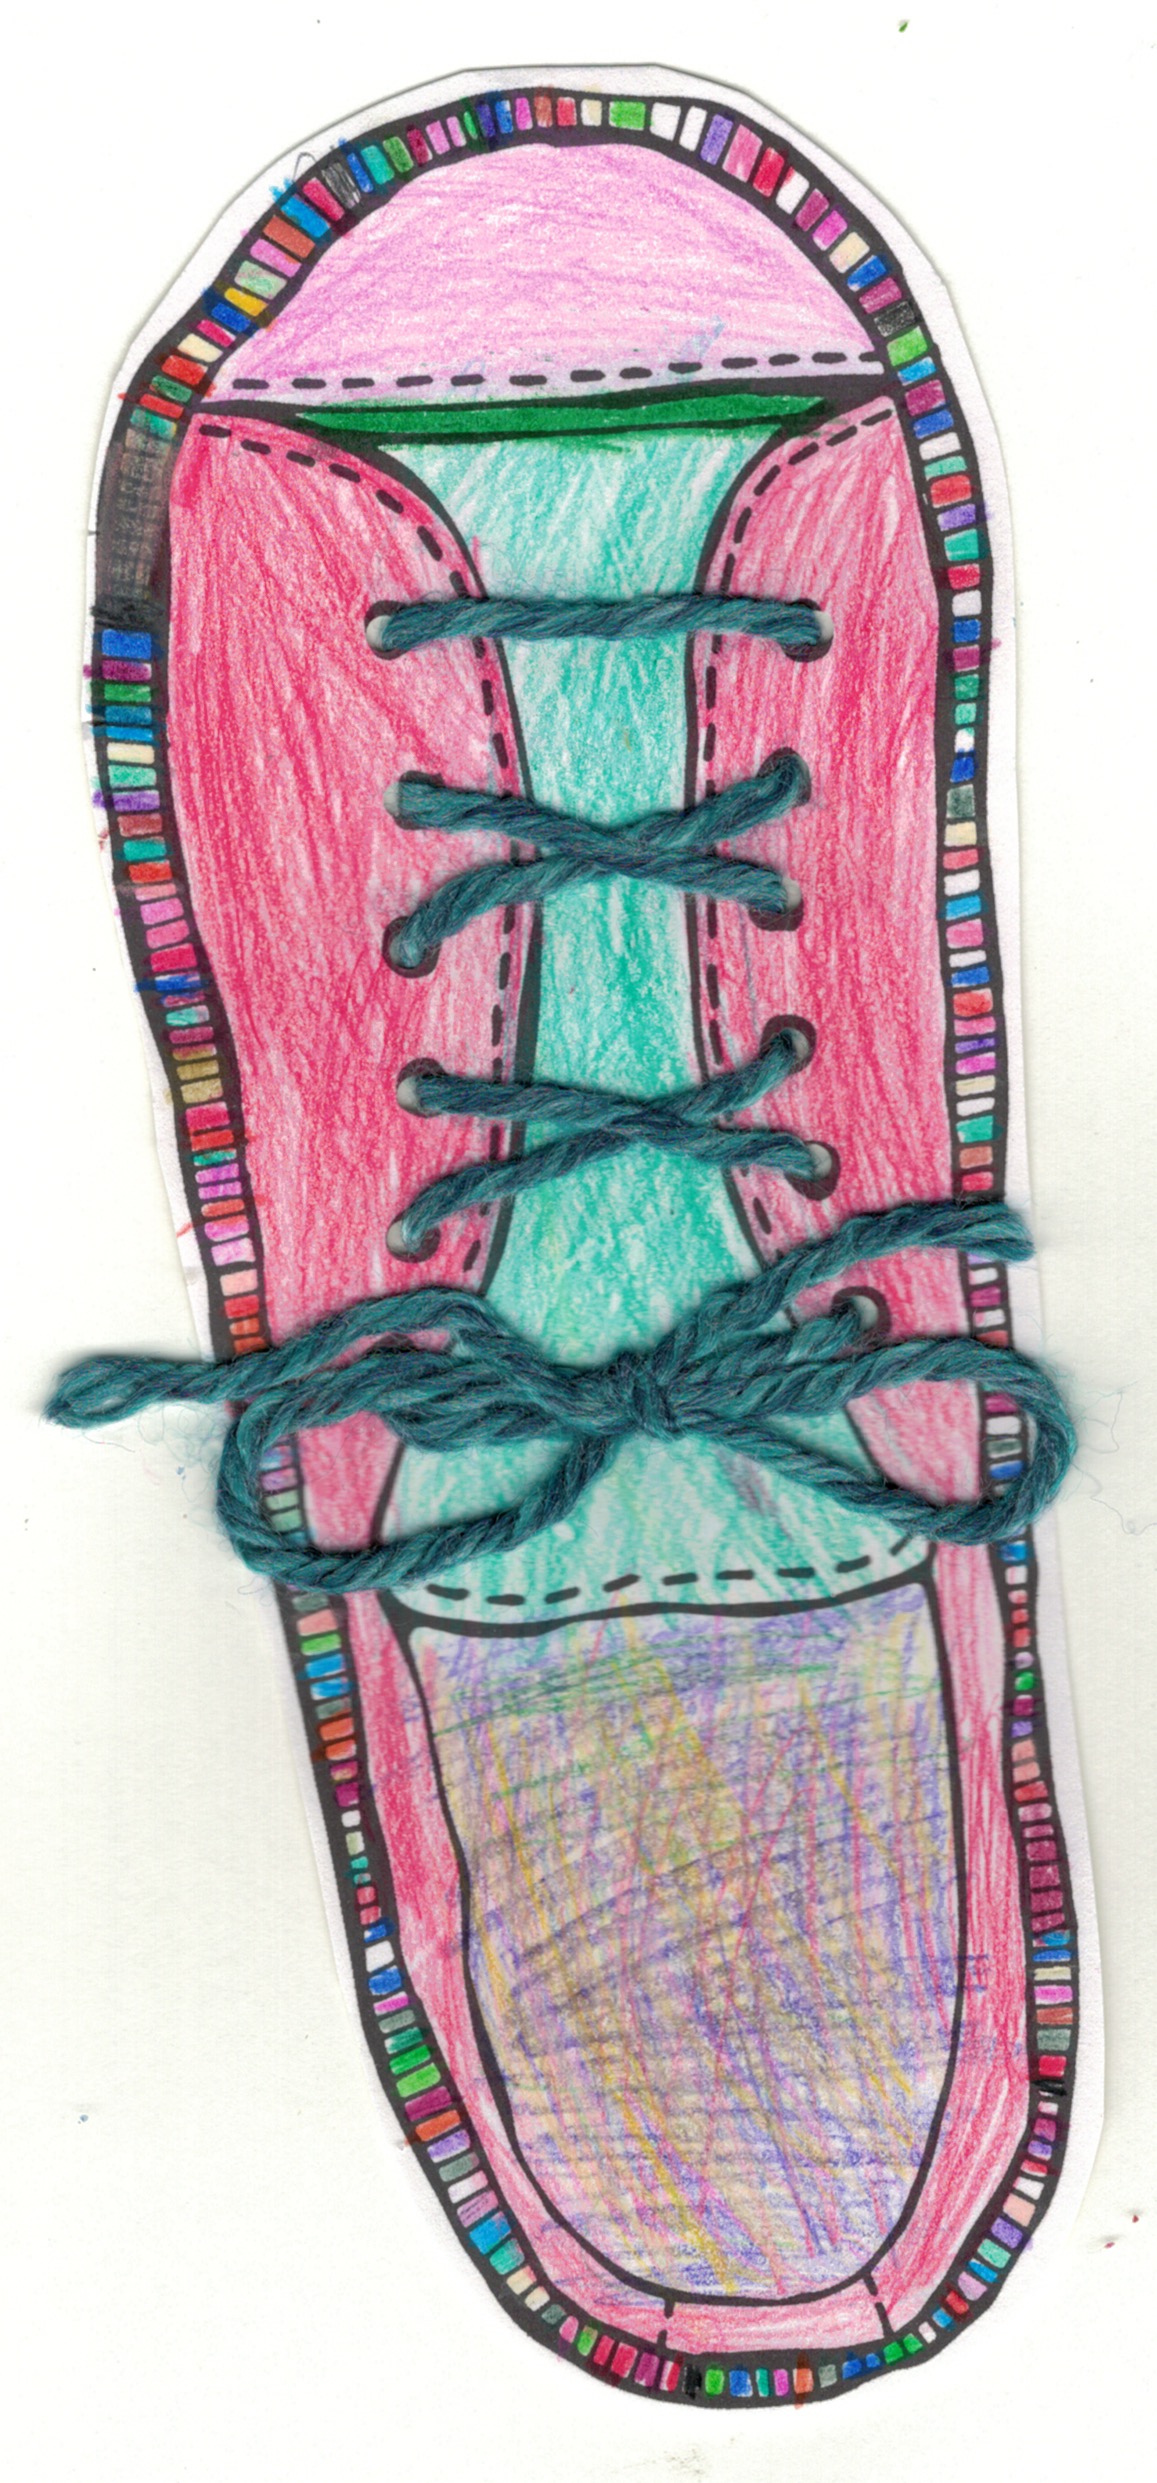
So I drew a coloring book page with a canvas sneaker. I drew it in fine tip sharpie, scanned it and emailed it to my sister. She printed copies and let the kids color the shoes any way they liked. They chose colored pencils for these, but this would also work with markers, crayons, or watercolor.

Download: If you want to make your own shoe print, you can download my shoe coloring book page here. It is yours to use any way you like.

I love to add texture and dimension to my designs so when I got the colored shoes back from the kids, I used a 1/8 in paper punch to punch holes at the eyelets and I made shoelaces from colored yarn. I threaded it through like lacing the shoe and tied a bow. Then I scanned the completed shoes.

Make the background transparent.

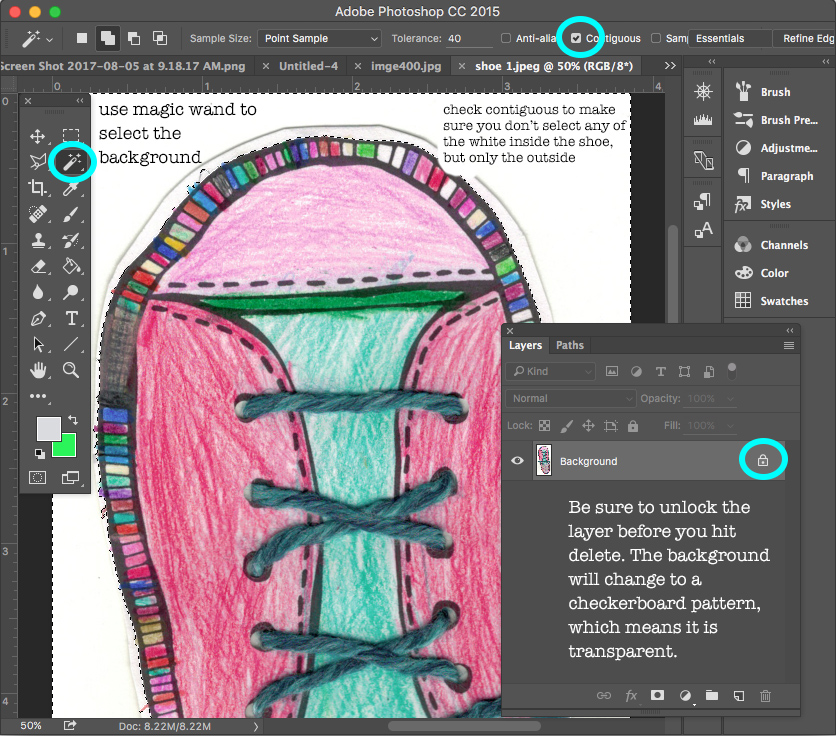
I opened each shoe in Photoshop so that I could cut out the shoe and make the background transparent. I used the Magic Wand tool to select the white background and then unlocked the layer so that I could delete that white edge and leave just the shoe.

  1. Choose the magic wand tool.
  2. Click the white area in the background of the shoe.
  3. Unlock the layer.
  4. Hit the delete key.
  5. The background should now be transparent (checkerboard).
  6. If your first click didn’t remove all of the white background, continue to select and delete the parts you don’t need.
  7. Here is a tutorial on how to adjust settings on the magic wand tool to fine tune and select more/less area.
  8. Save each shoe as a .psd file. (That’s a Photoshop file.)

Create the background canvas.

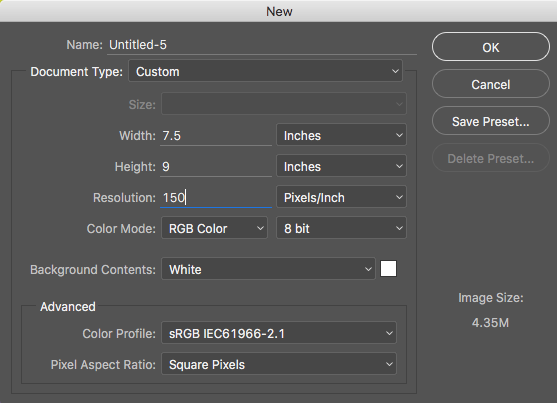
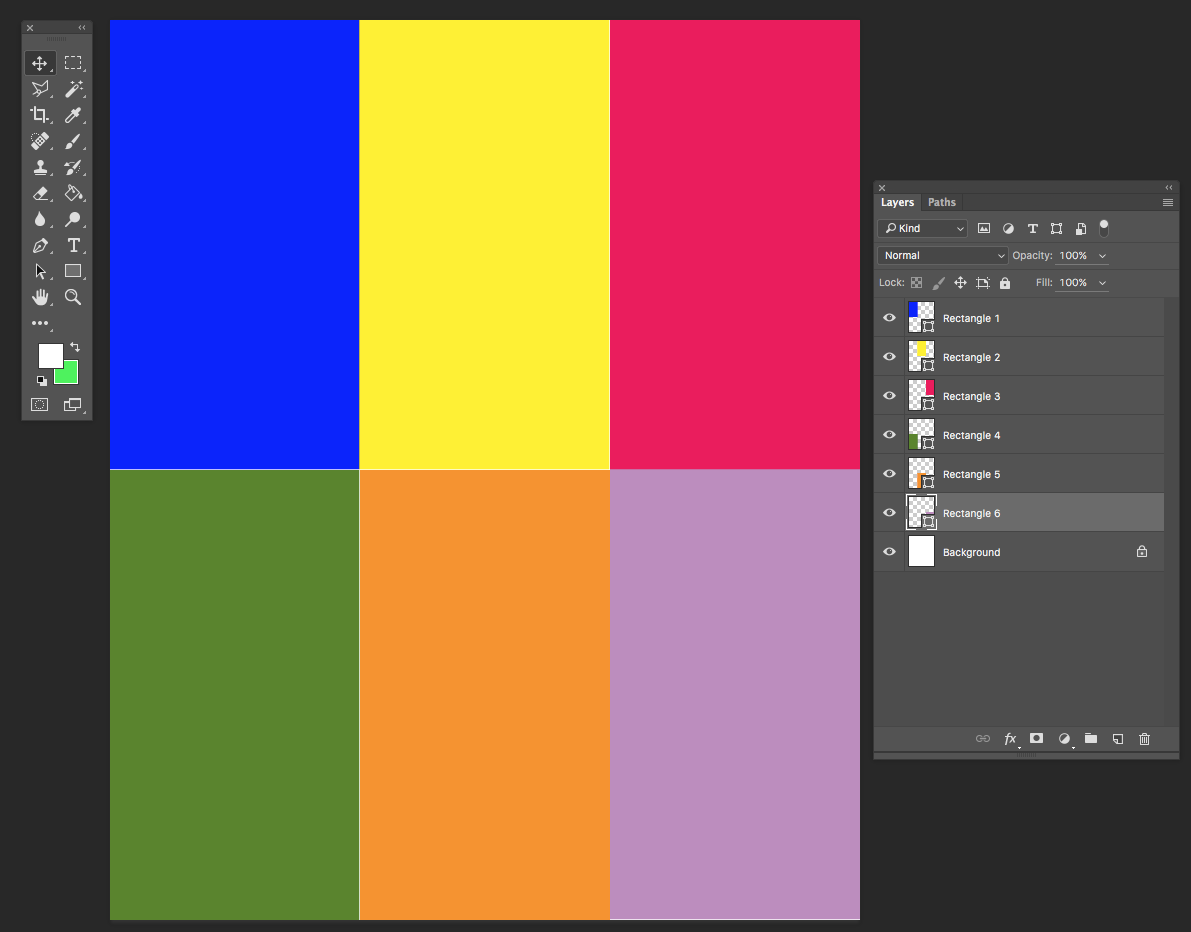
I wanted to do a repeating Warhol-inspired pop art design with the shoes by putting them each on a brightly colored background rectangle, so I set up a new canvas in Photoshop for the background. I created a new file that was 7.5 x 9 inches at 150 dpi. That’s the size I decided to make the repeat for my design.

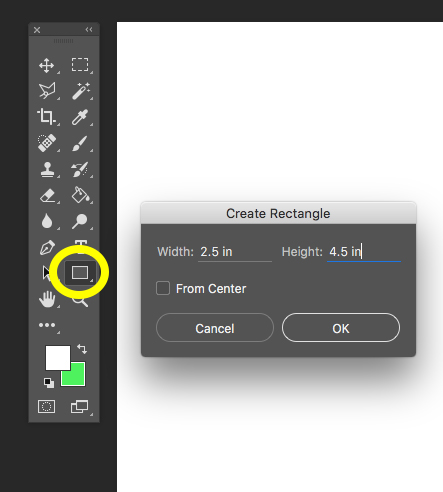
I filled this canvas with 6 rectangles, each 2.5 x 4.5 inches. I drew these using the Rectangle Tool (yellow circle below) and filled them with a random color. Hint: If you click once with the tool inside your canvas, it will bring up a dialog box and you can type in the exact size of the rectangle you would like. Just repeat that to make all six rectangles. Here’s a little more about how to use the Rectangle Tool. Use the Move Tool to move the rectangles into place and be sure that you have selected the layer that you want to move. (Each rectangle will be on its own layer.)


I am going to match the colors to the shoes a little later, so the colors don’t matter at this step, just pick ones with a lot of contrast.

Add the shoes to the design.

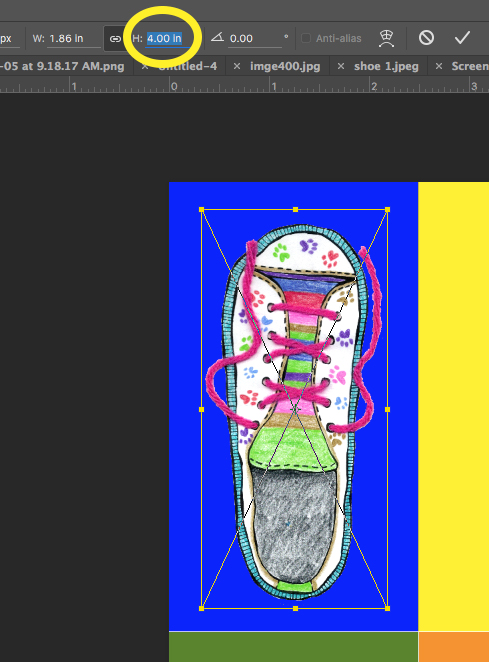
Next, I placed the shoes into the design, using File -> Place Embedded and chose the edited version with the transparent background. I resized each one as I brought it in so that each shoe would fit in a rectangle. I adjusted the height to make each one 4 inches tall and made sure to click the chain icon (to the left of the yellow circle) to make sure it was scaled proportionally and not “squished”. If you want to adjust them after you have placed them, be sure that you have the right layer selected. Each rectangle and each shoe will be on a different layer at this point.

Match the background colors to the shoes.

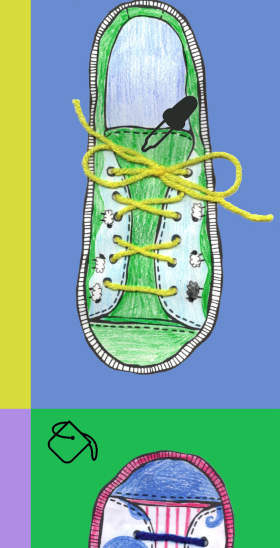
Finally, to recolor the rectangles and match them to the colors in the shoes, I used the paint bucket/eyedropper tool in combination. The annoying part of this step will be keeping track of which layer you are on, so I recommend going to Layer -> Merge Visible and making your design all one layer for this step.

I then switched to the Paintbucket Tool and hovered over a color in a shoe. When I hold down the option key with Paintbucket selected, my Paintbucket will transform to an eyedropper. I clicked with the eyedropper to choose a color from a shoe and then released the option key. Now the cursor switches back to paint bucket and I can click inside a rectangle to fill with that color. Continue to select (hold option – click) a color and paint (release option – click) until you have colors that you like.

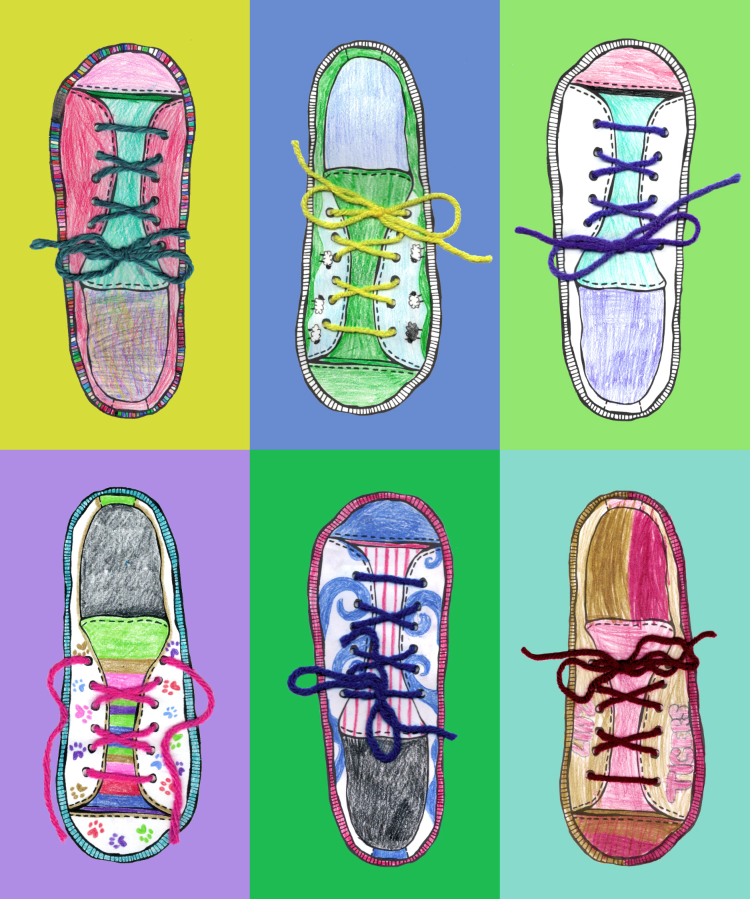
My finished repeat is below.

Save it and order a yard.

Now save this design as a .jpg and upload it to Spoonflower. I liked mine arranged as a half-drop repeat. You can get two bags out of one yard of fabric. I chose Basic Cotton Ultra for this project because I wanted the bags to be sturdy but not too bulky since they are designed to go inside another bag.

If you aren’t feeling like you want to design your own fabric or you don’t have kids around to do some coloring with you, I also curated a collection of great shoe fabrics by other Spoonflower designers. You can shop that Shoe collection here.


This is a great place to tell you that Spoonflower is giving you, my readers, a 10% discount! Use coupon code Rahn10 when you place your order. It’s valid until September 30, 2017 for orders of fabric, wallpaper and gift wrap and can not be applied with any other promotional offers.


Sewing the bag

Materials you need to make the bag.

  • 1/2 yard of shoe fabric. Basic Cotton Ultra is a great choice.
  • 1/2 yard of lining fabric.  I chose a lightweight cotton/poly broadcloth in bright green.
  • a 22 x 2 inch scrap of very lightweight fabric for the drawstring casing. I used a scrap from the selvedge of a piece of Spoonflower’s poly crepe de chine. Nylon or poly lining fabric is also a great choice. You want something that will allow the drawstring to bunch up and close the bag.
  • 1 yard of 1/4 inch paracord
  • A cord lock toggle. I got mine from this shop at Etsy.

Cut out rectangles.

You need three rectangles to make each bag.

  • 23 inches x 14 inches of your shoe fabric.
  • 23 inches x 14 inches of your lining fabric.
  • 21 inches x 2 inches of a very lightweight fabric for the drawstring casing.

Hem and fold the casing.

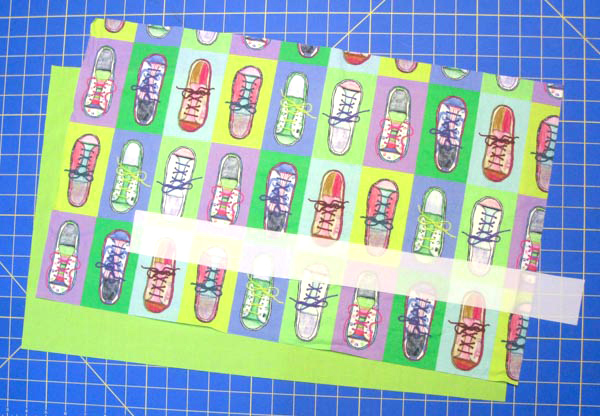
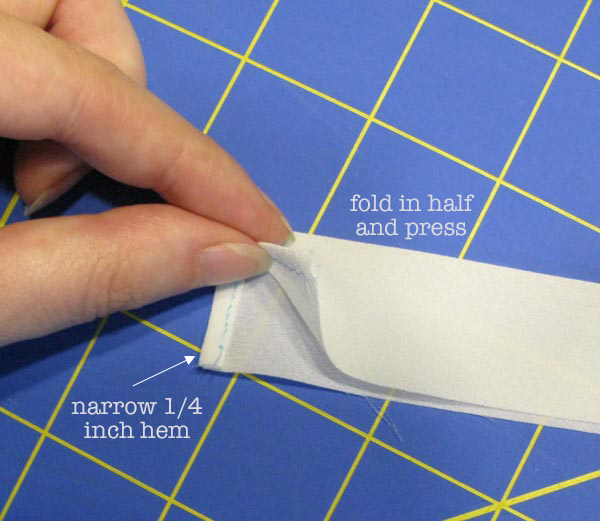
Start with the small rectangle of fabric for the drawstring casing. Make a narrow 1/4 hem at each short edge. Then fold the strip in half, matching the long edges and press.

Stitch the casing (top) edge.

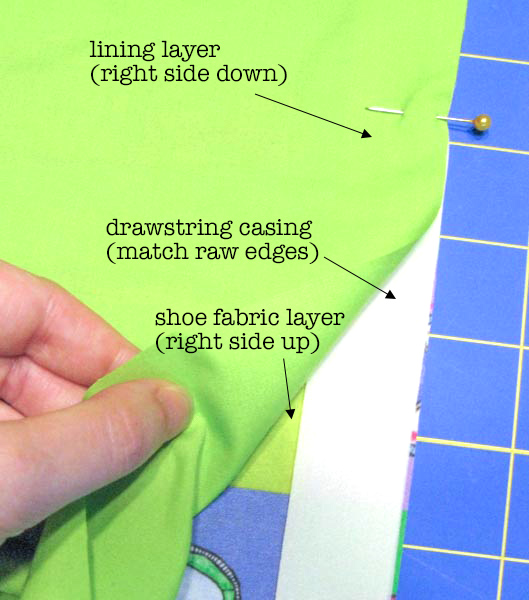
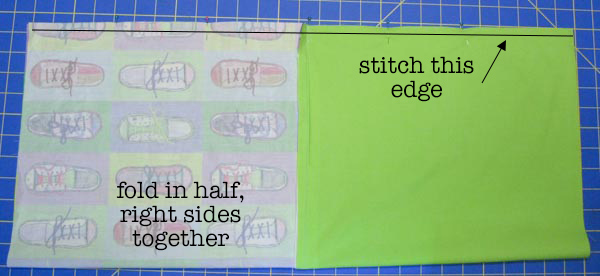
Lay the shoe fabric right side up on your table. Place the casing in the center of the long edge of the rectangle, matching the raw edges. Place the lining fabric right side down, matching the long edge. Pin through all the layers and then stitch the long edge using a 1/2 inch seam allowance.

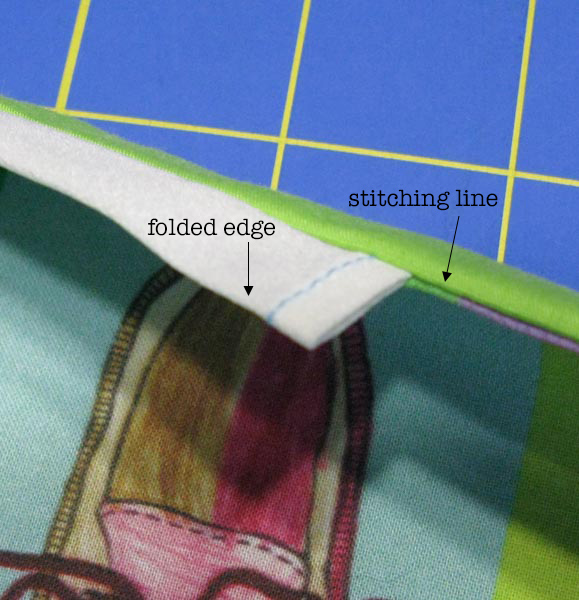
Turn the layers right side out and press so that the casing is free at the top and the shoe and lining fabrics are pressed down wrong sides together.

Stitch the side seam.

Unfold and open out your bag and refold it in half matching lining to lining and shoe fabric to shoe fabric. We are going to sew the outer and lining side seam all at once, making a tube. Match the long edges, pin and stitch with a 1/2 inch seam allowance. Press the seam open.

Mark the center, stitch the bottom.

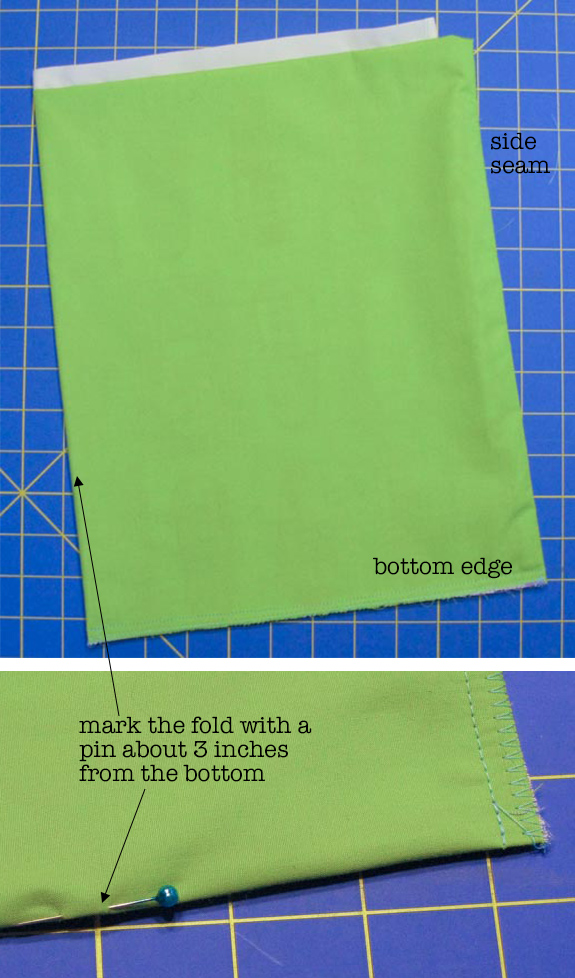
Turn the tube so that the casing is at the top, the shoe fabric is to the inside and lining is outside. It will be like a doubled over tube, open at the top and bottom.

We need to mark the side of the bag for the next step. Fold the tube in half along the stitching line at the side seam and lay it flat on a table. Then mark the opposite folded edge with a pin, about 3 inches from the bottom corner. You will use this pin to help make a corner gusset in the next step.

Stitch the bottom edge of the bag through all the layers, using a 1/4 inch seam allowance. You can serge or zig zag over this raw edge to keep it from fraying.

Open out the corners.

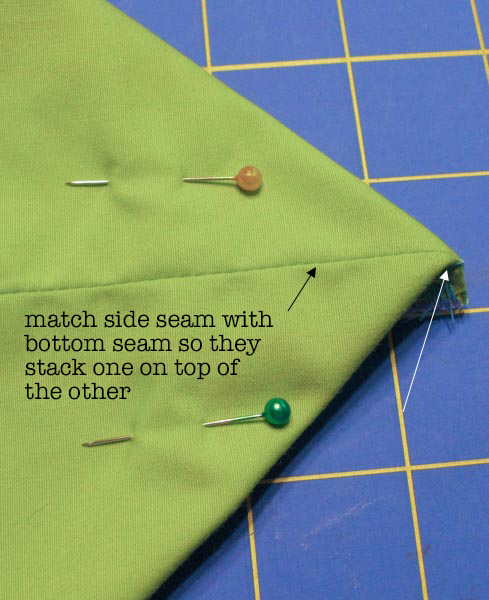
Starting with the side with the stitched seam, open out the corner of the bag and match the side seam (black arrow) to the bottom seam (white arrow). Stack them one on top of the other and fold it flat, creating a point right at the corner. Pin it to keep the seams from shifting.

Mark the gusset.

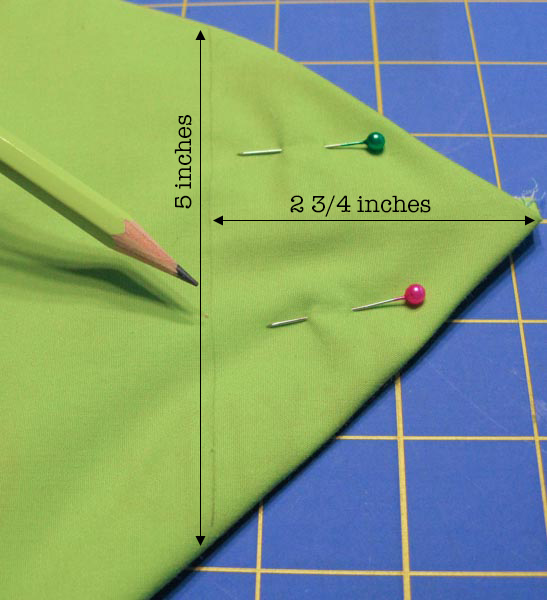
Measure 2.75 inches from the tip of the triangle and use a ruler to draw a light pencil line. Your line should be 5 inches from folded edge to folded edge. Stitch across the corner through all layers, following this line.

Repeat for the other corner.

Since you don’t have a side seam on the opposite side, use the pin you placed to match the side to the bottom seam. Mark and stitch the same way. This will form square corners on the bottom of the bag. You can trim away the excess at the corners if you want to remove some bulk, but I like to just fold it towards the bottom and use is as an extra layer of reinforcement.

Turn it right side out & add the drawstring.

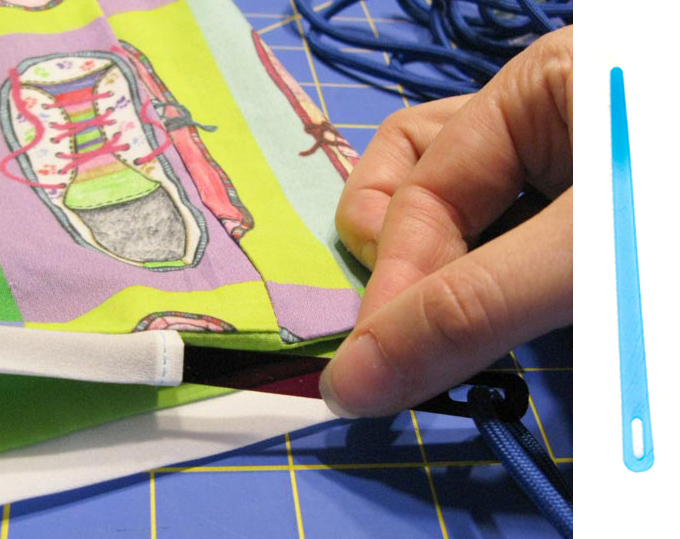
Turn the bag right side out. Cut a piece of paracord that is 36″ long. You can get one of my laser cut needles to thread the cord through the casing or use a large safety pin or elastic threader.

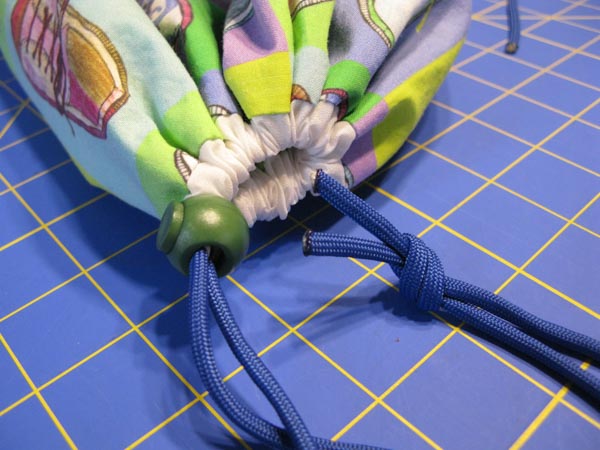
Slide the cord lock over the ends of the cord and then tie the cord ends together in a knot. Melt the ends of the cord so it doesn’t fray. (Please be careful! It gets hot and you should work in a ventilated area.)

If you want to follow along with the other blog hop posts in this series: Wednesday, August 2 – Robin Szypulski | Kritter Stitches – Bookbag on SF blog • Amy Watkins | Cozy Reverie – First / Last day of school photo pennants  • Kimberly Coffin | Sweet Red Poppy – 1st day of school outfit • Abby Glassenberg | While She Naps – Plushie key chain • Heidi Kenney | My Paper Crane – snack bags • Erin Williams | Printable Crush – book covers

20 April, 2017

Using Adobe Capture for Fabric Design

2017-04-20T09:04:42-05:00Everything Else, Spoonflower & Fabric Design, Tutorials|3 Comments

This tutorial comes to you via an email I received. This seemed like the kind of question that would make a great tutorial.

I love the patterns that I’ve created using Adobe Capture and I can see them in my library when I use Photoshop.  What I’m having problems with is making the Adobe Capture patterns into a seamless repeat to upload into Spoonflower. I have been able to upload my image into Spoonflower and it looks good as a swatch, a quarter yard; however, the full yard you can see that the pattern is not seamless.   I can’t find any video or blog info on how to do a step by step to make these beautiful Adobe Capture patterns into fabric.  — Shirley

What’s Capture?

Adobe Capture is an app for your phone or tablet. You can “capture” colorways or patterns in the app using your device’s camera and they are loaded directly into Adobe Photoshop or Illustrator in the Libraries tab. Once they are in the Libraries, you can use them in your Photoshop or Illustrator designs. Here is a great tutorial & description from Adobe for a little more about how Libraries work.

For this tutorial, I am going to talk specifically about the workflow of taking a Pattern that you create in Adobe Capture and how to upload it to Spoonflower to make a fabric design.

Create the pattern

First, you need to create a pattern in Adobe Capture and save it to your Library.

Launch Adobe Capture and make sure you are signed in to your Adobe account. Choose the Patterns tab at the top of the screen. Then tap the + button at the bottom to add a new Pattern.

Use the built in camera to capture an image or you can choose something you have saved to your Camera Roll by tapping the thumbnail in the top right. Along the left side of this screen, you see the different pattern repeat types you can choose. Each one crops out a section of the image and repeats it by mirroring and rotating it. When you have the pattern you like, then save it by tapping the purple button.

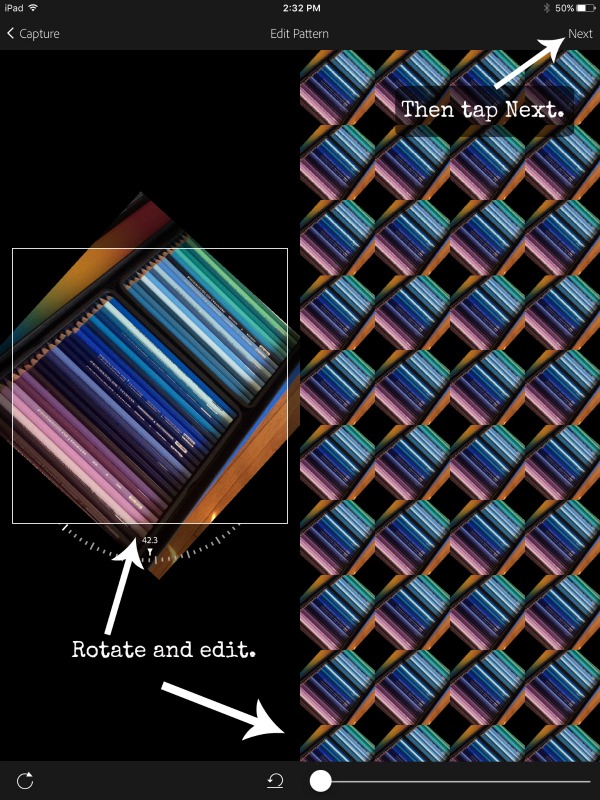
Next you will come to the Edit Pattern screen. You can change the angle and some blending on your photo. Once you are happy, tap the Next button at the top right.

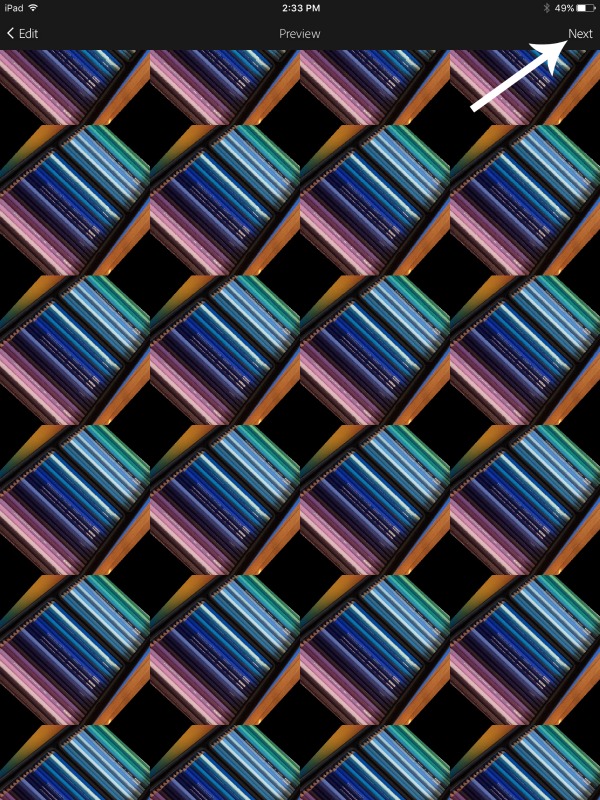
Then you will get a Preview screen so you can see what your pattern would look like filling up the whole screen. Cool. Tap Next at the top right.

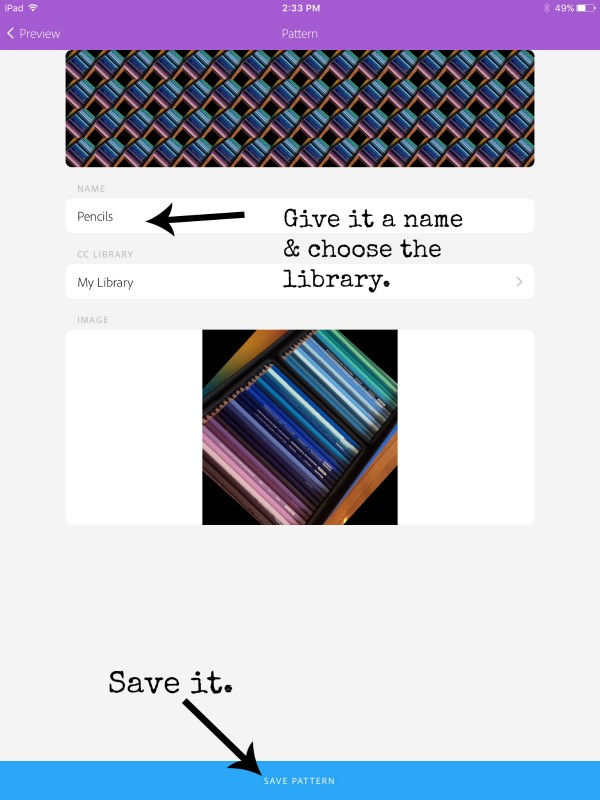
Finally save it to your Libraries. You can give it a new name and choose the Library you want to save it into in the dropdown. Then tap Save Pattern.

Finding your Pattern in Photoshop

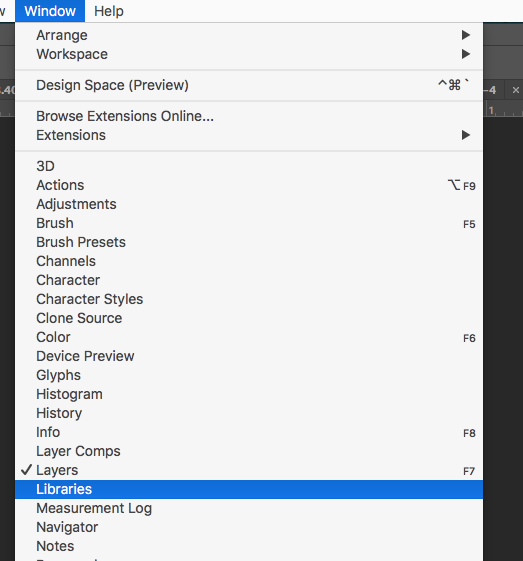
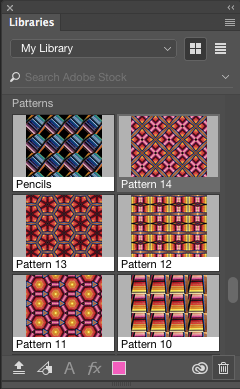
Here’s the cool part. When I open Photoshop, this pattern is going to pop up there automatically. Look for a palette that is called Libraries. It is often not open by default, so you will need to go under the Window menu and find Libraries to open it up.

Within that Libraries palette, scroll down until you see Patterns and there you will see the Pencils pattern I just made. (Sometimes they take a few seconds to pop over there depending on your wifi speed. Be patient.)

So why do we have to go to Photoshop? Can’t we just upload that pattern from Capture somehow? The pattern isn’t actually a file you can upload directly to Spoonflower, although that would be really handy. It only exists in the Pattern palette until we fill a canvas and turn it into a .jpg. Think of it like a knitting pattern. Until you take the pattern and knit a sweater from it, you can’t wear the sweater. Until you apply the Pattern to something, you can’t use it at Spoonflower.

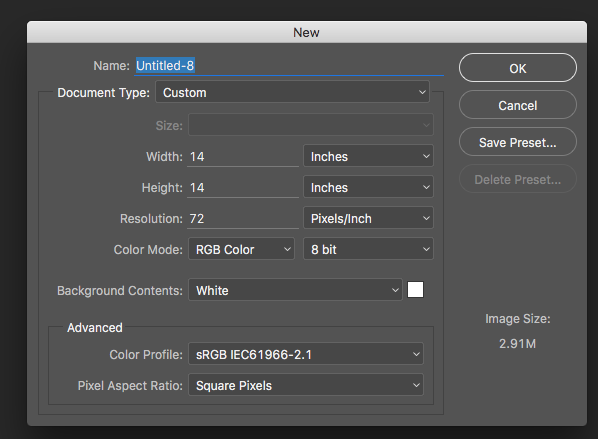
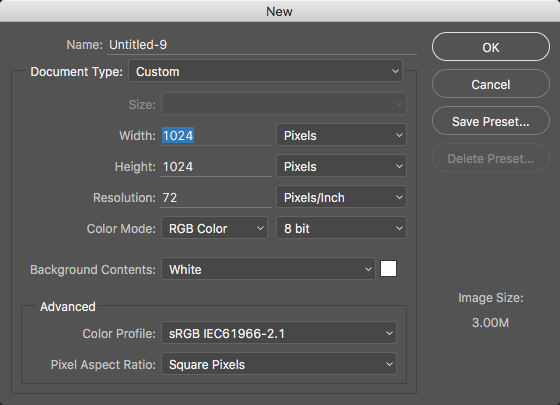
Make a new blank file by choosing File -> New. I made mine 14×14 inches at 72 ppi. I will explain why I chose that size in a minute. Then I click the pattern in the Libraries palette and it will fill the canvas with that pattern.

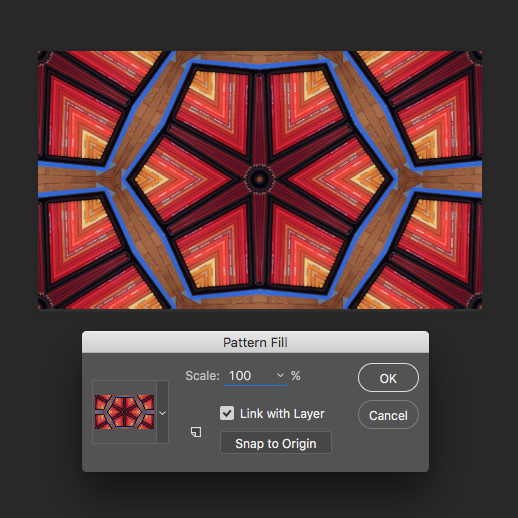
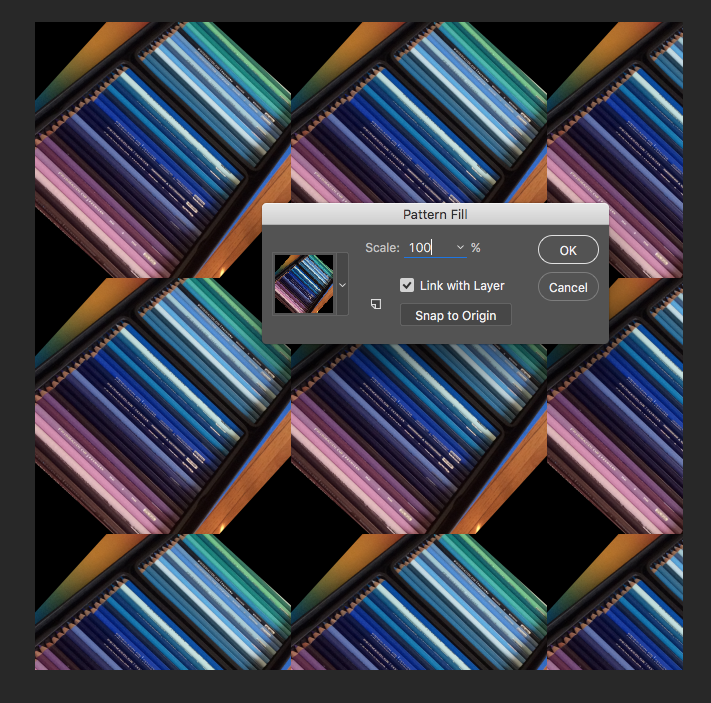
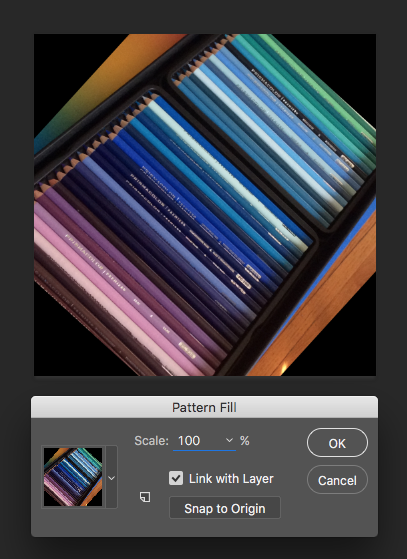
A Pattern Fill dialogue box will pop up asking what scale you want to fill your canvas. Enter 100% in the scale box and click OK. Why 100%? Because I want to make this the largest it can possibly get. It’s super easy to scale it down in Spoonflower, but I want to save it the biggest I can get it so I have the most options for using it. Now that we’ve filled something with the pattern, we can save this and upload it to Spoonflower.

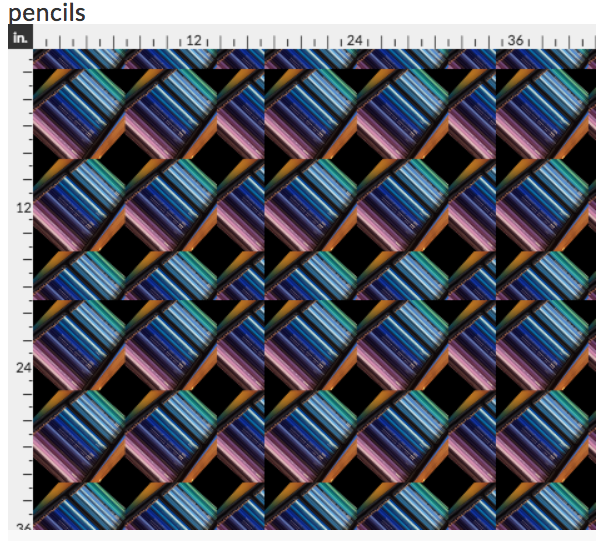
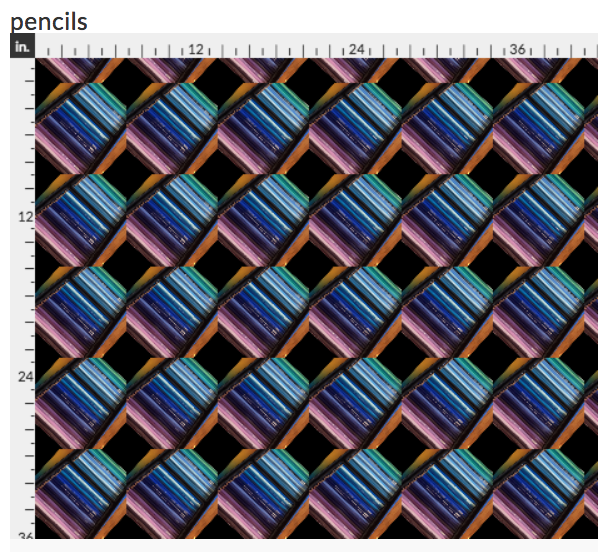
But first, I want you to take a look at this image. I think, based on Shirley’s email that we saw at the top of the post, this was the step that is tripping her up. If I upload this right now to Spoonflower, it’s not going to be seamless. You are going to see a flaw. If you look at the left and right sides of the image, you can see that they wouldn’t match up. There is a half an image on the right side, but no half image on the left to match it to. Here’s what it would look like if I uploaded it right now.

That’s not the same thing we saw on the Preview screen up above. Why? The repeating pattern tile that Adobe Capture creates is a set size and that size is not 14×14 inches. Photoshop filled the 14 inch canvas exactly as we asked, but to fill it, it used about 2 1/2 repeats by 2 1/2 repeats of our tile. I picked a 14 inch canvas so I could show you this example, but there is a better size to make your canvas.

Making One Repeat

To make it seamless on Spoonflower, we need to upload one repeat, not 2 1/2 repeats like we made in that example file.

So how do you make it so you have just one repeat? That took me a little sleuthing and I couldn’t find this spec published anywhere so I had to go in to Photoshop and figure it out. (ie Lots of trial and error and zooming in looking at pixels. You can imagine this step.) Disclaimer: I couldn’t find this information actually published anywhere, so this is the results of my experiments. I may be off by a pixel or so but I think this is accurate.

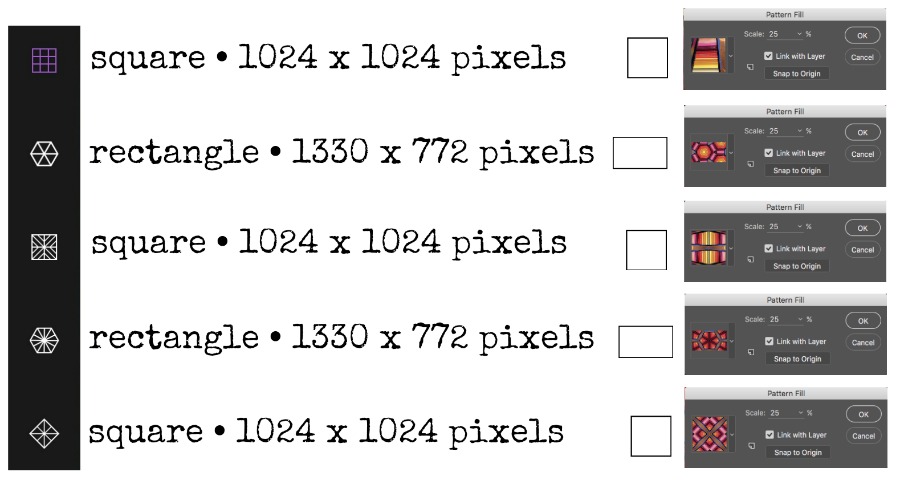
For each of the different repeat styles you can choose in Adobe Capture, it creates a pattern tile that is an exact size. I made the chart (shown above) that tells you what those sizes are. For some of the patterns, the tile is square and for some it is a rectangle. The size you see on the chart represents the size of one repeat at 100% scale.

Making one repeat is pretty straightforward once you know the size. Create a new file by going to File -> New and fill in the size of a single repeat from the chart.

If you don’t remember what repeat style you chose, there isn’t a really good way to tell which is which. A good rule of thumb is that if you can see hexagons in your design anywhere, it was very likely one of the rectangle (1330×772) designs.

Now choose the Pattern by clicking on it from the Libraries palette and set it to fill at 100% scale. Now I have one repeat.

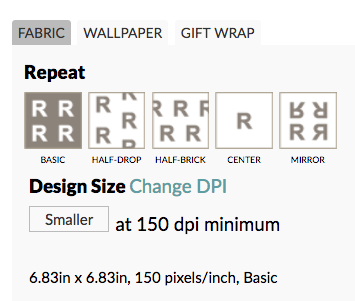
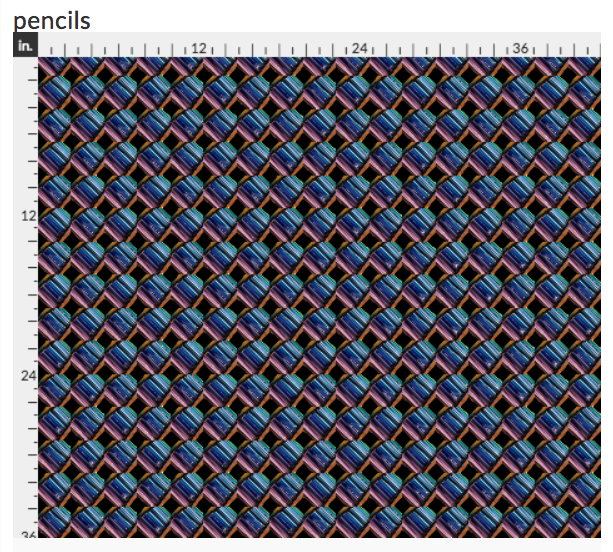
Save this file as a .jpg and upload it to Spoonflower. Choose the basic repeat style. Now the uploaded design at Spoonflower looks just like the Preview we saw on the iPad screen.

The preview we are looking at in the image above is 1 yard of fabric, which means this repeating element is pretty big (almost 7 inches). If you want to scale it down, just click the smaller button under the Design Size section until you like the scale.

I clicked the “smaller” button a bunch of times and this shows a repeat size of about 2.5 inches on a yard of fabric. Perfect!


Thanks, Shirley, for a great question! If you have a question you’d like me to write a tutorial about, just ask! I love getting ideas from you.

17 April, 2017

An introvert’s guide to surviving an art show

2017-04-17T11:59:52-05:00An Artist's Life, Tutorials|4 Comments

A friend posted a comment on something I wrote on Facebook:

I want to have a booth at a show, but I am nervous that I will not be charming enough. Any tips for being yourself And an introvert and a good salesperson for the crafts you love to make?

That seemed like an awesome thing to think about and share what I do. I am a major introvert. When I say that, I always have students from my classes say “There’s no way you’re an introvert.” but it’s really true. When I am in front of a class, I can turn off the introvert for a while and I enjoy it, but I have a timer and it runs out. I get what I call a “teaching hangover”, especially when I teach in the evenings where I need several hours to unwind and reset before I can sleep or deal with people again. It’s a different feeling than just being tired. I feel prickly and scatterbrained and I crave silence. (It’s a lot like the onset of a migraine now that I think of it.) I need to get that out of my system before I can do anything else. So a class that goes until 9 pm means I will be up until 2 am before I feel like I can relax again. I know that about myself, so I have come with a lot of ways to make it work.

When you’re an introvert, showing your art at a show is pretty much you having to be “on” for 8 or 10 hours straight, which is so hard to do. The reason people come to art shows is because they are interested in handmade items and they are interested in meeting the artists that make them. That means you. My last post was all about how that interaction with the artist can make all the difference in both positive and negative ways. So here are a few ways I deal with being an introvert and surviving a long show day and making sure I am being the best ambassador for my art.

Meet your neighbors

One of the first things I do is try to meet the people that are set up on either side of me. Especially if you are staffing your booth by yourself, it’s nice to feel like you have a couple of friends who are in the same boat. It makes it feel less awkward to borrow a sharpie or masking tape from them and you have someone to eye-roll with when things are slow. Chances are good that everything is going to be crowded (because it always is) and you are going to be encroaching on each other’s space in some way. That’s a lot easier to tolerate from a friend when you are crawling under their table to find your water bottle or their customers are standing in the way of your display and chatting.

Don’t forget fuel

It’s tempting to get a giant latte loaded with sugar and figure that caffeinated energy will carry you through your introvertness. And that works to a point. But around Hour 3 when you are jittery and the sugar has crashed, your ability to cope with crowds of people is toast. It’s going to be loud and you will get thirsty from talking a lot. Water is good. I am not really excited about plain water, so I drink a lot of tea. I have decided that almonds, apples & cheese are pretty much the perfect show snack. Cut everything up into small pieces. Stash it in a container under the table. You don’t want anything that makes your fingers messy and you want to be able to eat it in a couple of bites. You might get a break, but you might not. And I don’t know about you, but if I am hungry, I am even less interested in talking to people and they stress me out more.

Be present

The simplest version of this one is “don’t sit down”. It’s tempting to make yourself a home base where you feel comfortable watching people come in to your booth, but you are out of the way. But the problem is that when you sit down, you are tempted to pull out your phone or your knitting or something to keep yourself busy. Then you are looking down and not making eye contact. And then you look busy and someone with a question might not want to interrupt because it looks like you are counting stitches. And we introverts don’t want to be interrupted, so this one just perpetuates itself. A tall stool or chair helps with this, so you can literally sit and not have to be on your feet all day, but you are still at eye level with the people who are shopping and not tempted to hide in your phone. My phone battery is iffy so there is no surfing for me or my Square checkout might not make it through the day. I always wear a bracelet to fidget with even though I would love to have my knitting to fidget with instead. Being present also means not letting yourself get monopolized. I overheard several unhappy comments from customers at my last show because one of my neighbors had a huge bunch of friends in the booth chatting with each other. No one else could get in to look and the artist was completely unaware.

Don’t get trapped

This one is about your booth design. It took me a while to figure out the simple design of “here’s a table with all of my stuff and I stand behind the table” totally makes me feel trapped. I am constantly on display along with my art right in front of all of those people, aka the Introverts Nightmare. I now try to make a booth where I have several places to stand, including out in the aisle. I want to be able to see my things at all times, but I want to be able to move around and not have me or the customer feel like we are watching each other. I think it also helps to wear a nametag so that no matter where I stand people can figure out that I belong to the booth. Some shows really don’t lend themselves to this, but give your design some creative thinking. I have seriously taped out the space with masking tape on my livingroom floor and mocked up the booth before I go.


Find the story

Ugh. Small talk. Right?

“Let me know if you have any questions.” is a good opening line, but it’s so commonly said that we almost don’t hear it any more. Often the first thing someone says when they walk up to my things is “Pretty fabric” or something like that, so my opening line has become: “Thank you! I design all of these fabrics and have them digitally printed.” At which point they usually look up at me with a confused look on their face (because what I do is unusual) and they ask me a question. “What do you mean digitally printed?” “You designed all of them?” “You can do that?” And now we have a conversation started and it’s the easy conversation. It’s easy to talk about what you do because you love it. You wouldn’t be doing it otherwise. You aren’t selling it at that point, you are sharing your love and enthusiasm for it. And that’s a way more fun conversation than “How much is this?” I also print out a card that talks about what’s unusual about my work and I put it in the display. That’s for the introvert shoppers.

What’s the opening line you can say that invites people to ask you more?

  • Something you can’t tell by looking at it (ie it’s digitally printed)
  • Alternate ways to use it (ie it’s a necktie, but I am a girl and I am wearing one right now)
  • What’s unique about it (ie I use all reclaimed fabrics or recycled silver)

Have a break

Get a friend to come. Leave for 5 minutes and go away from the crowd where you can be “off” for a while. Walk outside or even hide in the bathroom. Anything where you can be anonymous for a couple of minutes will give you a little chance to reset. I rarely have someone stay in the booth with me. There is never enough room and you tend to talk to that person instead of customers. But someone who can drop by for 10 minutes is the best gift you will get all day. It’s always the last thing I think to organize, but it’s so important. Shows will often give free or assistant passes to vendors; this is what you use those for. This person doesn’t need to know how to do anything more than say “The artist stepped away for just a minute and will be back soon.”

Go home and reset

This is important for multi-day shows. I always have invites to go out and grab dinner after a show and I rarely say yes. You need the time in the evening to reset if you are going to do another day at the booth. Have a hot bath, eat something, drink a glass of wine, go to bed early.


I have actually gotten to where there are some art shows that I really enjoy. I know what to expect, I know I will be having the same small talk conversation all day and I still enjoy it. But that’s taken some practice. Your first few shows are going to be exhausting. Making your booth/strategy work for your personality is going to make you feel more confident and even if it feels a little contrived to come up with an “opening line”, the more you do it, the more natural it becomes and it doesn’t feel that way at all.

3 February, 2017

Three Minute Tutorial: Clipping Mask in Illustrator

2017-02-03T15:12:28-06:00Spoonflower & Fabric Design, Tutorials|Comments Off on Three Minute Tutorial: Clipping Mask in Illustrator

In my previous post, I talked about cutting out the armadillo armor shape from a paint texture and I wanted to dig in a little bit to how that actually works because it is a really neat technique. It uses a tool called Clipping Mask. I am going to show it to you in Illustrator, but you can do it in Photoshop too.

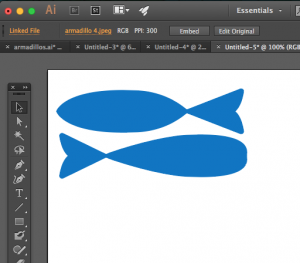
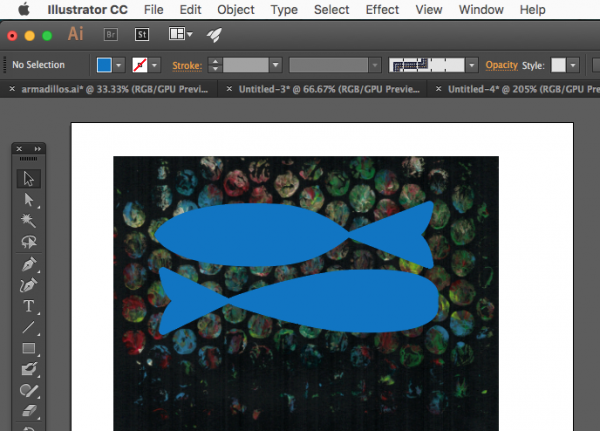
Screen Shot 2017-02-03 at 2.28.49 PMStart with the shape you want to cut out. For the armadillos it was a cloud shape that was their armor. For this example, I drew two simple fishy shapes.

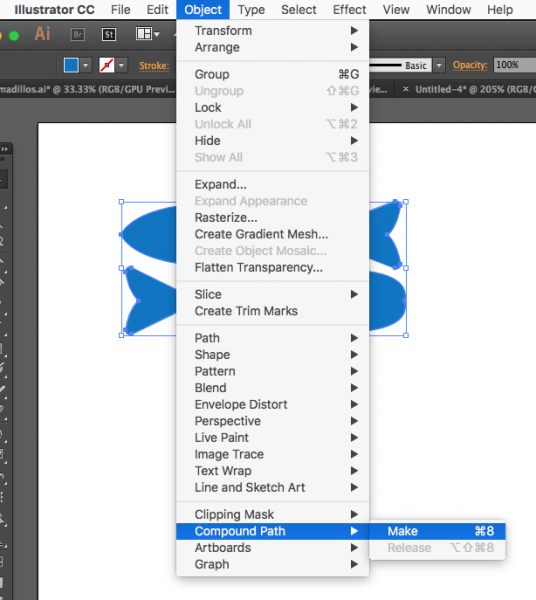
If you have more than one shape, like these two fish, you need to create a “compound shape” from them so you can cut them all out at once. Choose the black arrow Select tool and shift-click to select both shapes. Then go to Object -> Compound Path -> Make.

Screen Shot 2017-02-03 at 2.31.42 PM

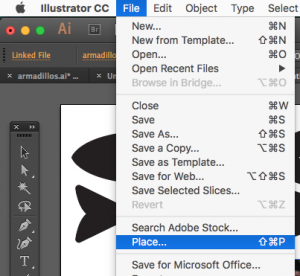
Next you need to add the texture you want to cut things out of. We do that by Placing it in the file. Go to Edit -> Place and select the texture you want. Any .jpg will work. Choose a photo or a scan that you have. I placed the bubble wrap texture that I scanned because I think it also looks a little like fish scales. Once you have placed it, it will show up as another object on your canvas. You might need to resize it; you can do that by clicking the toggles on the corners and dragging it bigger or smaller.

Screen Shot 2017-02-03 at 2.28.19 PM

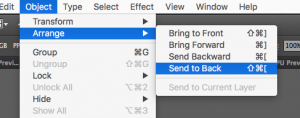
We need the texture object to be behind the fish, so select the texture and choose Object -> Arrange -> Send to Back. Now move the texture and the fish around so that the fish are covering up the part of the design you want to cut out.Screen Shot 2017-02-03 at 2.48.10 PM

Screen Shot 2017-02-03 at 2.31.55 PM

The last step is creating the Clipping Mask. Select all of the objects (fish and texture) and then choose Object -> Clipping Mask -> Make. (You can also right-click once you have them selected and a menu will pop up right where you clicked. Choose Clipping Mask.)

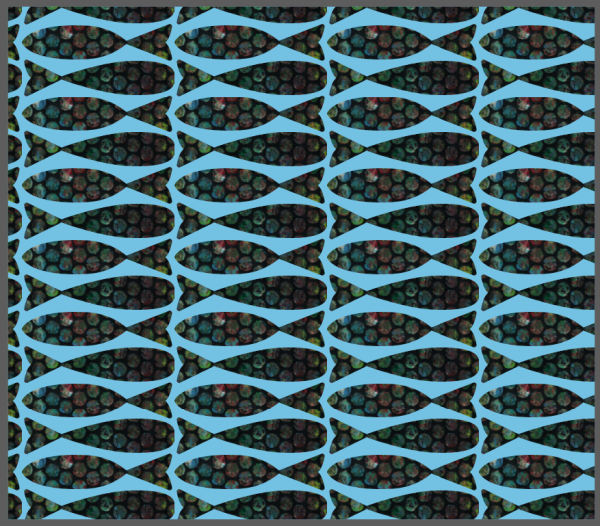
Now you have fish cut out of bubble wrap texture. You can do the same things to cut words out of a photo or make a valentine heart from your dogs’ faces.

Screen Shot 2017-02-03 at 2.35.03 PM

Screen Shot 2017-02-03 at 3.02.02 PM

Go to Top