8 October, 2013

Fondazione Lisio, Florence Italy

2013-10-08T22:52:02-05:00Weaving, Felting & FIbers|1 Comment

lisio-10

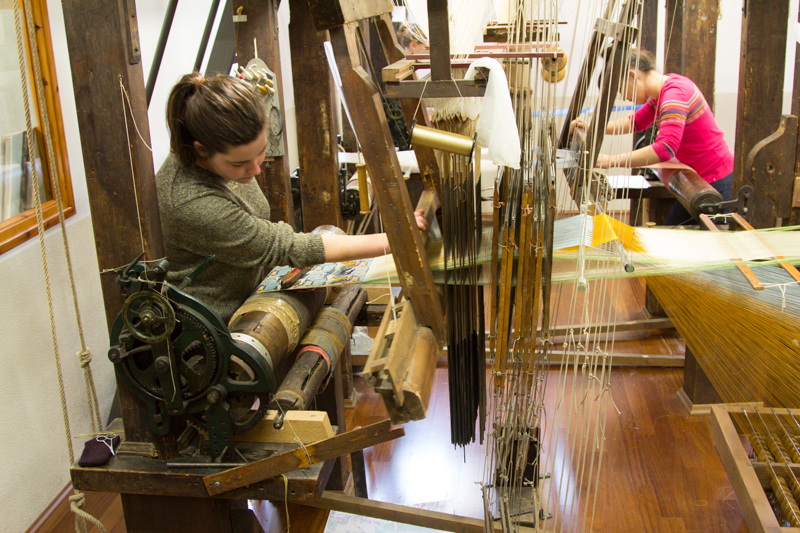
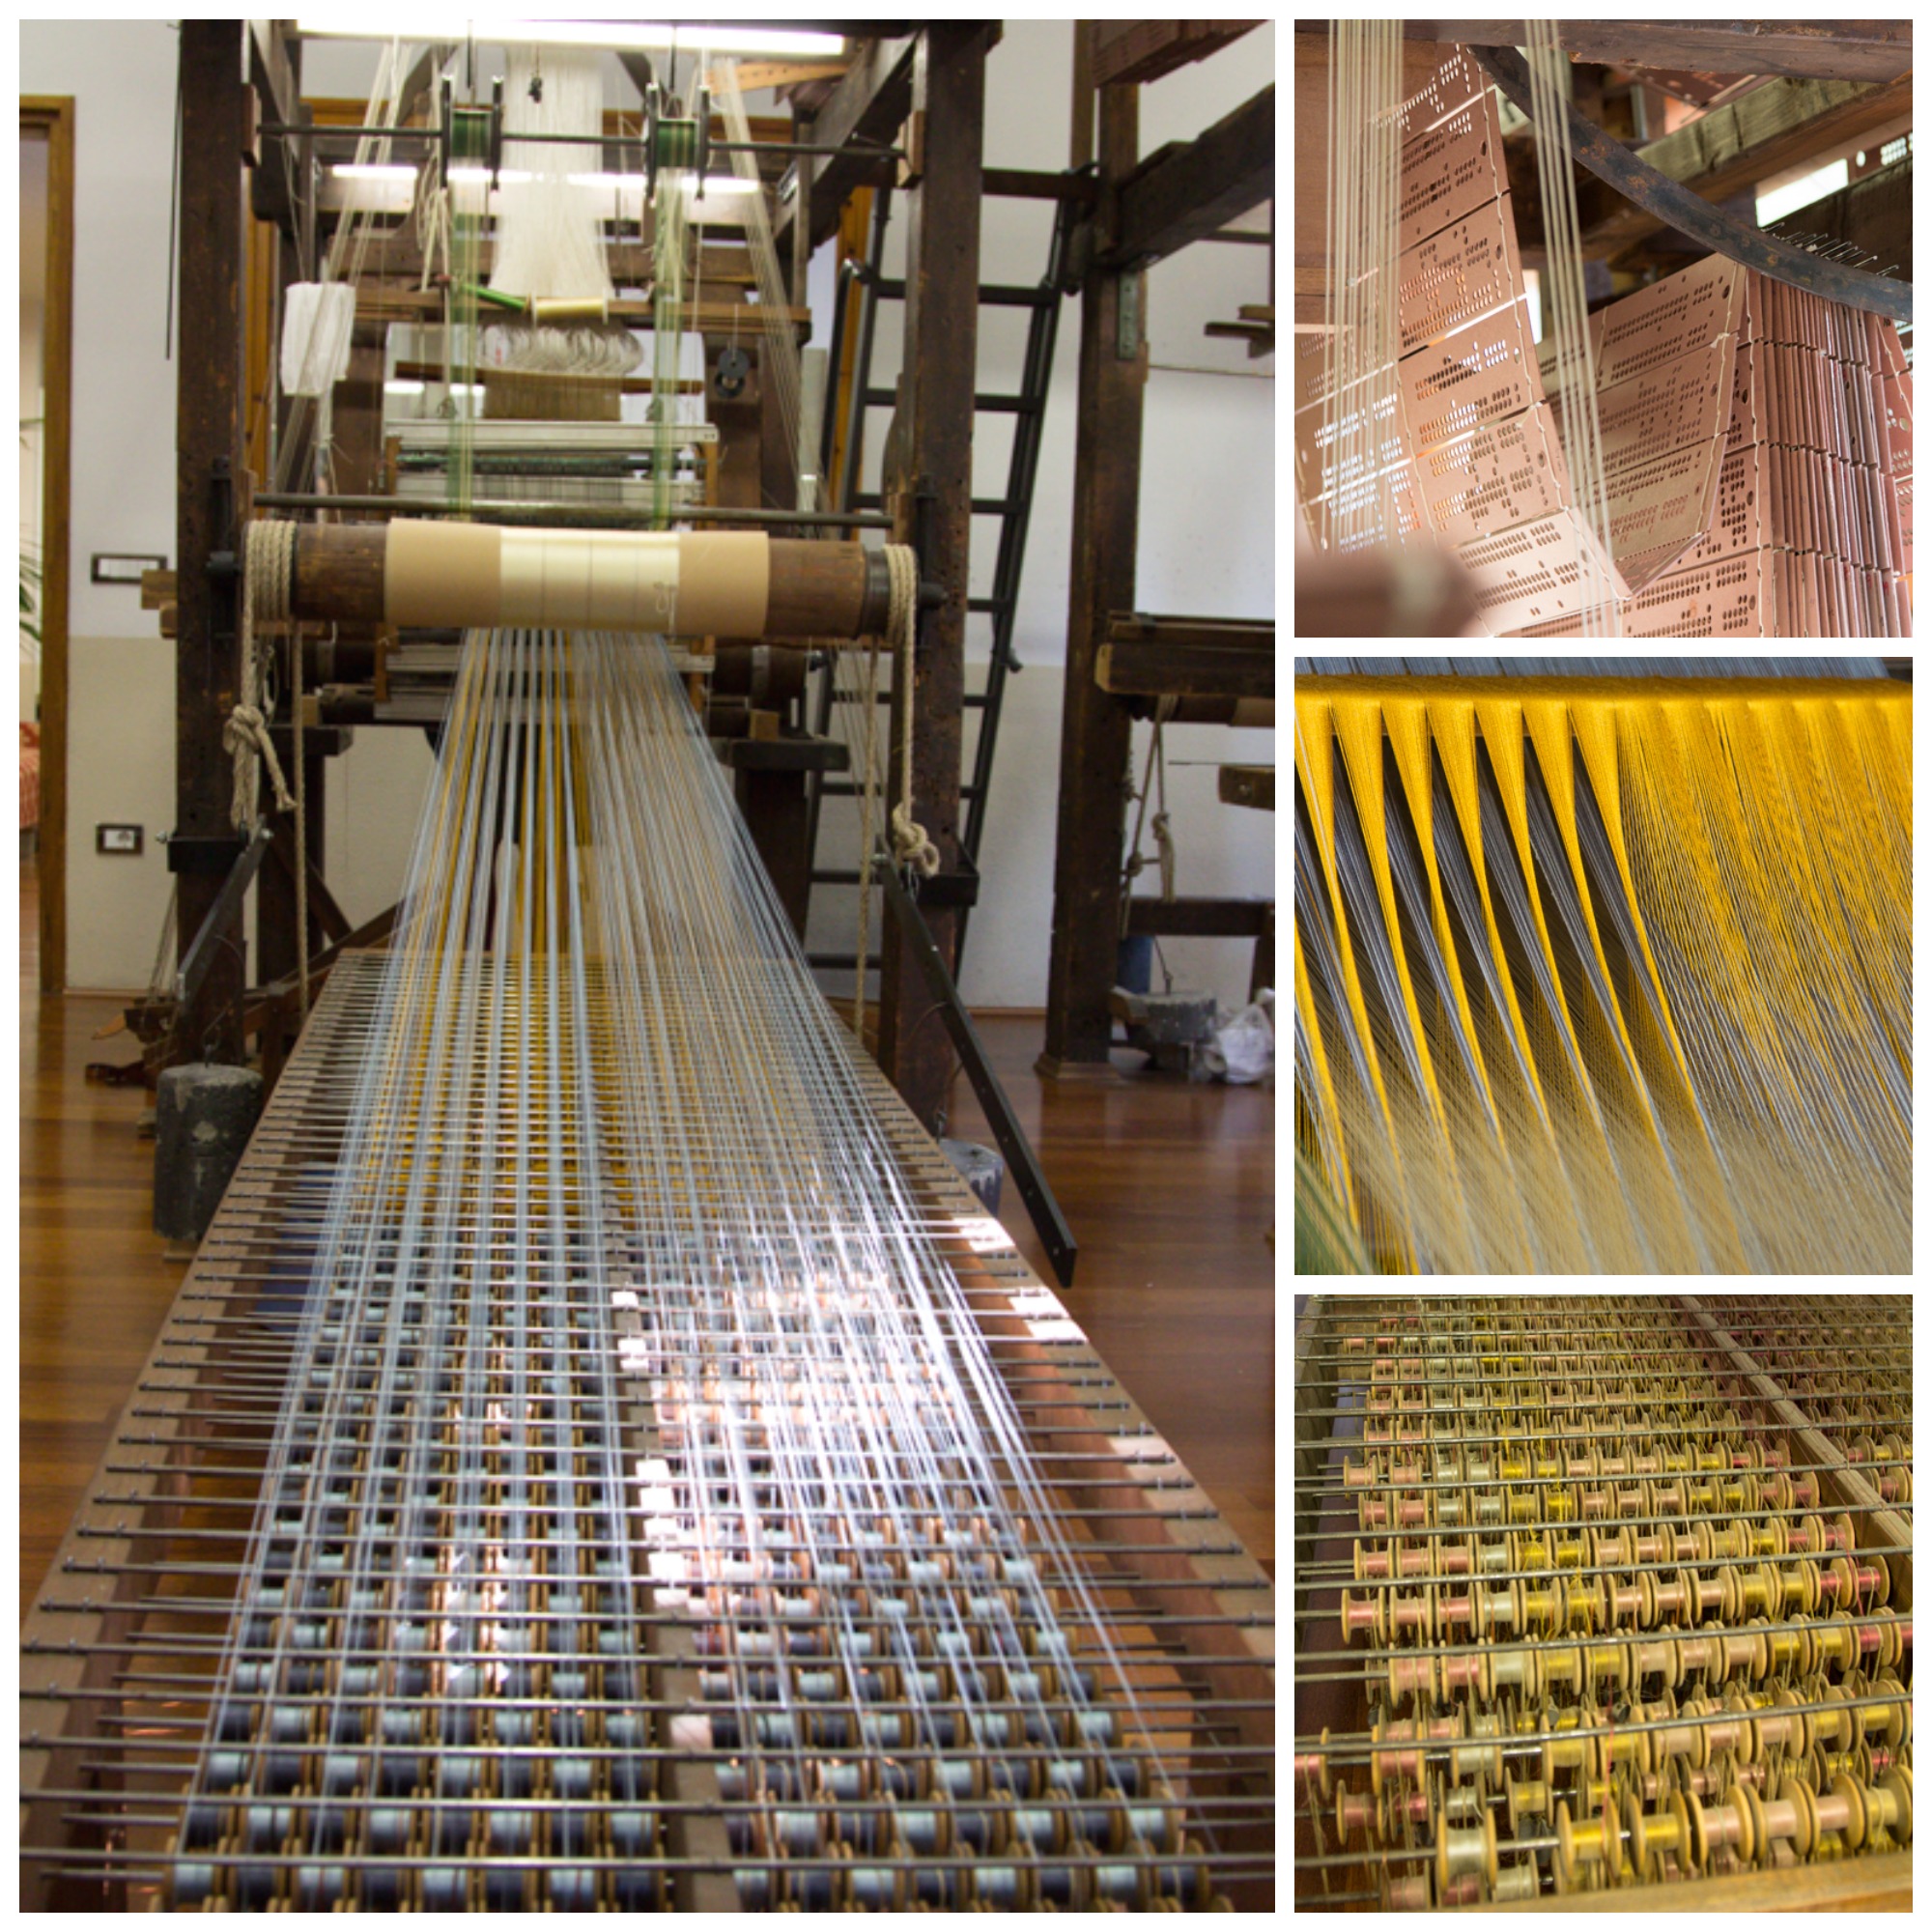
Fondazione Lisio is a non-profit organization dedicated to preserving the traditions of of weaving silk velvet and brocade on jacquard looms, which are probably two of the most intricate and fascinating techniques I have ever seen woven.  We were very fortunate to have one of the fantastic and very knowledgable instructors, Julie Holyoke, who was willing to give us a guided tour of the school while there were about 10 students working on the looms.  The girl pictured above was creating a velvet.  The loom is two “stories” high (you can see the ladder to the top level in the photos below).  The students plot out a pattern and then key it into the cardboard punch cards, which are a very simple kind of computer program which helps the loom know which threads to move up and down for each row of the pattern.  We talked to one of the students who was making her punch cards that day and she was concentrating very hard to make sure she kept them in the right order.  On this loom, the warp threads are all on individual spools because when weaving a velvet, you need to be able to pull up the extra warp to make the velvet pile.  For each row of velvet, the weaver inserts a tiny brass slat that pulls up the warp threads to make a loop of a certain height.  A few rows are woven to hold them in place and then the weaver runs a razor blade along the top of the metal slat and hand cuts each row of pile.  You can see a photo on their website here.  Seriously.

lisio1

The students were all young and most were there filling some kind of course requirement for their college program.  I didn’t talk to many of them as they were very busy working, but they come from all over the world to study at Lisio.  The photos below are fabrics made at the school.  The top left was the last bit of a commission they had done for Versailles.  They had a sketch and had reproduced a textile that had been worn out or damaged.  This was also a cut velvet, but the background was solid silver threads.  If you got at the right angle to look at the piece, it was like a mirror.  The velvet pattern was in a sky blue over top of the silver background.  The bottom left was a bag woven for Fendi.  The Lisio has a great partnership with Fendi to make an exclusive woven purse for them every year.  This one in the photo was woven with silk, raffia and brocaded flowers and others had feathers and all kinds of other fanciful designs.  Fendi has an awesome video here and you can watch the weaver cutting the velvet.  I saw the weaver working on next year’s Fendi bag, but I am sworn to secrecy.  ;)

lisio2

21 May, 2012

It is time once again for GIVEAWAY DAY!

2012-05-26T08:15:51-05:00Everything Else, Freebies & Patterns, Weaving, Felting & FIbers|166 Comments

That’s right, it is Blog Giveaway Day once again.  This is a bi-annual event, co-ordinated by the hard-working team at SewMamaSew.  Bloggers participate by offering a giveaway on their blog and then linking up to the SewMamaSew site so that everyone shows up together as a big giveaway party.  So be sure to jump over there and browse the other giveaways too!


THE BIG PRIZES

These were a big hit last year, so I am giving away two again this year: Little Loom Kits.  Have you ever wanted to learn how to weave?  I designed these looms and have them lasercut from bright colored acrylic plastic.  They are a simple frame style loom, just right for making coasters and little squares of woven fabric.  Knitters – you can use up all of your scrap yarn!  The “kit” comes with the complete instructions, the loom, three needle-style shuttles and a “beater” comb for packing the rows together.  They are fun and easy to learn.

RUNNERS UP

And because I know it is just really fun to win something, I am going to make a few more people happy and draw some random names to receive a “High in Fiber” bandana.  These are hand-dyed and silkscreened from my sheepy illustration, 100% cotton, machine washable.  I use these bandanas for everything – as a tea towel, to wrap up my scissors before I throw them in my knitting bag, as a picnic plate/napkin, keep one in the car for spills, as a handkerchief, and my husband wears one under his bike helmet to keep the sweat out of his eyes.  Darn useful.

HOW TO ENTER

  • To enter you must comment on this post.  (Comments are moderated.  Don’t worry if yours doesn’t show up right away.  I will approve them as I get the chance.)
  • In your comment, you must answer this question:  What is your favorite fiber and why?  (aka silk, cotton, linen, bamboo, corriedale, BFL?  The list goes on and on!  It could be in any form: yarn, fabric, roving etc.)
  • Enter your email address in the “Mail (will not be published)” section of the comment box, so I can contact you when you win.   (Please do not include it in the text of your comment; that just invites spambots.)  Your email address will only be visible to me and I will not collect it, share it or use it to send you spam.

THE SMALL PRINT

Winners will be drawn at random from eligible comments.  (aka my family is not eligible to win, but they always like to play along)

I will ship prizes internationally.

Comments will be open until May 25 at 5 p.m. PST.

Winners will be contacted via email by May 26 and posted here once I have heard back from all of them.

I will ship the items on or about June 1.

(Edited:  So sorry, the blog was down for a few hours on Wednesday night!  We are back now.)


27 February, 2012

A Visit to a Woolen Mill

2012-02-27T21:53:10-06:00Out & About, Weaving, Felting & FIbers|Comments Off on A Visit to a Woolen Mill

A couple of weeks ago I was lucky enough to be invited along on a tour of a working woolen mill.  The Faribault Woolen Mill was opened in 1865 and has been in nearly continuous operation since then.  You can learn a little more about it, if you are curious, at the website.  The mill was closed for a while and the building flooded but it just recently re-opened with enthusiastic new management.  The people I met and talked to while I was there are passionate about what they do and really excited about all of the new things that are happening.  The whole building had a positive feeling.  They aren’t really open for public tours yet, so I was really delighted to have been invited along.

We started our tour in the basement of the building where the wool comes in and is processed.  I was amazed that they are actually able to do everything from dyeing to spinning to weaving all in the same building.  They are currently buying wool that is cleaned and baled, but eventually hope to have the machines back up and running that can process raw fleeces so they will really be back to doing every step.  They have a large dye area where the wool is custom dyed either in their “signature” colors or in custom colors for special orders.

This is one of the bales of wool being pulled apart.  They start out as about 3 foot cubes that weigh 900 lbs.  They say that a blanket takes about 6 lbs, so that’s 150 blankets out of one cube.  That’s some densely packed wool!  They told us that right now they are working with merino, romney and ramboulliet because those have the right length fibers for their equipment.

This is the start of one of the spinning machines.  The wool travels through a series of about 3-4 carders and comes out the other end as tiny beautiful even pencil roving, wound on big rolls.  Each roll is about 10 inches in diameter and is made up of about 30 individual strands.

These then move over to the spinning machine to put the twist in and make it in to yarn.  These end up being about the weight of size 8 perle cotton.  You can see the large rolls on the very top and the roving is spun and then wound on to more bobbins at the bottom.

Finally, it makes its way over to the large looms.  This one was working away at flag blankets while we watched.

There are several more steps to finishing, fulling, making fringe, adding labels etc that we didn’t tour this time, but I am hoping to see on another trip.  I was completely enthralled through the whole tour.  We also learned about how they are developing ingeo fiber, made from corn, that they are combining with the wool.  Ingeo has all kinds of great properties that really compliment wool, so they are excited about the possibilities for that.  I came right home and ordered two blankets from their online shop and I am completely in love.

21 October, 2011

This also is not finger weaving

2011-10-21T10:03:29-05:00Embroidery, Spoonflower & Fabric Design, Weaving, Felting & FIbers|3 Comments

This is ply split braiding.  I have been completely fascinated with this technique for about 2 years and finally was able to take a class from the Weavers Guild on Wednesday.

We made cool twirly ornaments and I sweet-talked the instructor into teaching me the “wave” pattern also.  It was a lovely group of students in the class and we had fun chatting as we worked.  Ply split braiding is an Indian technique, used by nomadic peoples to make camel tack.  Those must be some pretty well dressed camels!  The general idea is that you are using 4 ply cords and pulling the cords in between the plys of another cord.  You have a little tool called a gripfid that helps you get in between the plys.  It’s a little bit addictive.  I bought some cords from the Guild so that I can practice a little on my own before I decide if I need a cord maker.

After I had a fun morning taking a class, in the evening I got to teach a class on beginning embroidery.  I had a ball and I hope my students did too.  Three of the five students were named Tracy, which had to mean this class was special!  They let me take some pictures of their hands working.

They are stitching on some fabric I designed and had printed at Spoonflower.  On the right side was a “stitch along” section with colored dots.  Everyone could follow along – “put your needle down at the blue dot, then poke it back up at the red dot, wrap the thread around the back of your needle and pull it through.”  At the end of class you had this stitched sampler to go long with the handout, so you had a reference to remember how you did each one.  We learned back stitch, threaded & whipped backstitch, chain stitch, detatched chain & lazy daisy, and the chinese knot (which is way better than the french knot.)

Then the left side of the fabric had either a chickadee or a goldfinch, which you could embellish with all of these new stitches.  I had the idea to make the class about stitching on printed fabric because starting from a blank white “page” is so intimidating and it takes way more than a class period to finish anything that looks like something.  This way we added texture to the wings, outlined birds with backstitch and stitched lazy daisy snowflakes and you only had to master a few stitches to make a beautiful finished project.  I showed the class three different ways to finish off your winter bird (pillow, pincushion/ornament, wall art).

I am hoping to do the same class next semester and this class requested session number two where I teach them 5 more new stitches.  Alternating chain stitch, satin stitch, blanket stitch, feather….  Hmmmm.

18 October, 2011

One of these things is not like the other…

2011-10-18T20:06:41-05:00Classes & Teaching, Weaving, Felting & FIbers|Comments Off on One of these things is not like the other…

I am presenting a session in a couple of weeks for art educators about Native American fiber art. So I started today to do a little research to write the background info on finger weaving for my handout.  Many schools study the Voyageurs in Minnesota history and so finger weaving is something that comes up frequently.  When I started googling, I was dismayed at how many techniques are being labeled as finger weaving.  Can you spot the “real” finger weaving in the collage above?

In the top left you see finger knitting.  I often have kids tell me they know how to fingerweave and really they mean finger knitting.  What’s the difference?  Finger knitting involves making loops.  Loops go over your fingers and loops go over one another to make a stretchy knit fabric.

Next is backstrap weaving.  This uses a small rigid heddle to hold the threads in place and to help you move them back and forth to create the weave.  The warp threads are put through the heddles and you weave with a separate shuttle thread.

On the top right is loom knitting.  It works the same way as finger knitting, just with more “fingers”.  This is a sample made on a comb, which is a great idea and I know my summer camp kids will think this is groovy.

Bottom left is macrame.  It has beads and square knots.  (It’s a screen shot from a YouTube video so I could see the process as they were working it.)

And finally, finger weaving.  Finger weaving is like an elaborate braid, where you are moving the warp and weft threads with your fingers.  It is unusual in that the same threads are used for both warp and weft, they just change places as you work.


Go to Top