3 September, 2014

Reverse Appliqué

2014-09-24T18:28:38-05:00Embroidery, Sewing & Design, Tutorials|1 Comment

Last week I spent a day at the MN State Fair demonstrating mending.  Well, it started as demonstrating mending, but watching someone stitch a hem is about as much fun as watching paint dry.  ReUseMN, the organization that was sponsoring the demos is all about reuse and repair and each day they had a different group showing how to fix up something.  I had brought a bunch of little projects with me, but I needed something that would draw people over.  So I started “mending” a t-shirt with reverse appliqué.

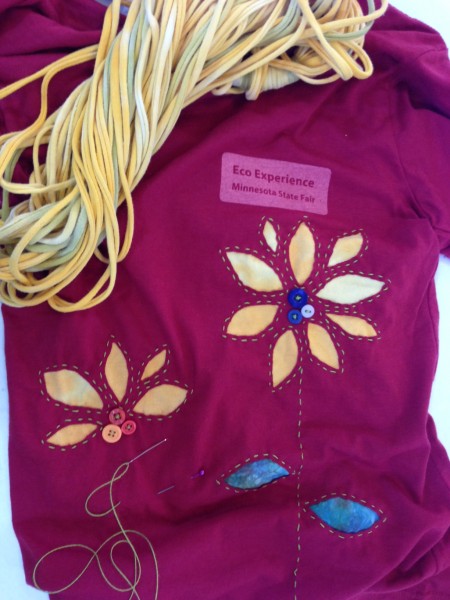
photo 2

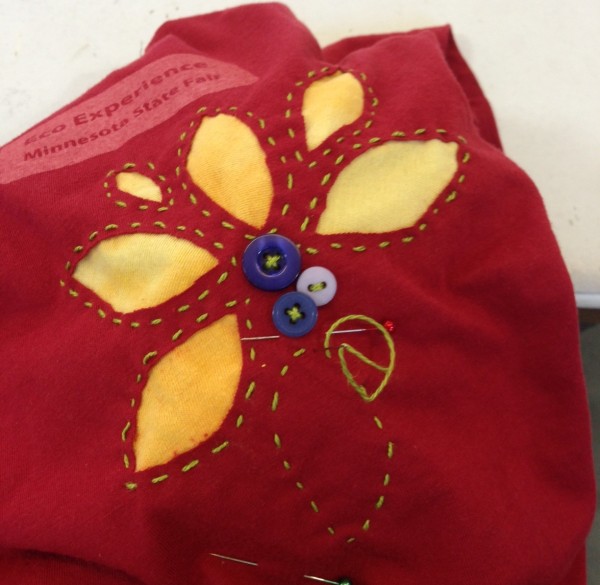
Appliqué means that you take a little piece of fabric and stitch it on top of another piece of fabric, like a patch.  It’s a good way to fix a hole.  Reverse appliqué means that you take  little piece of fabric and stitch it behind another piece of fabric.  When you trim away that top layer, you can make really cool designs and you can get rid of a hole or a bleach stain.  You can see one flower petal in progress on the t-shirt above.  The yellow fabric is another t-shirt that I brought along. I put a piece of yellow behind the red, stitched each petal and then cut away the red t-shirt.  I worked on this shirt all day, making 4 sunflowers with leaves and a butterfly.  (I turned the rest of the yellow t-shirt into some t-shirt yarn and made an infinity scarf.  That’s a fun project for another post.)

photo 1

If you love the look, be sure to check out Natalie Chanin’s work.  She has made reverse appliqué (especially with knits) pretty famous.  Molas, a South American art form, are also made using reverse appliqué.  The Hood Museum of Art has a great article about making molas that you can download here.

Frequently asked questions while I was working and chatting with people at the fair:

Won’t that just shred itself where you cut it?  You can’t wash it?

I am always surprised when I get this question.  Why would I make clothing that I couldn’t wash?  For the most part, knits don’t fray or come undone when you cut them.  Especially t-shirt knit.  The edges will curl up a little bit especially on an edge that gets stretched a lot, but it’s going to hold up just fine.

You have to sew it by machine if you really wanted to wear that, right?

I guess there is a perception that if you make it by machine that it is somehow stronger and better.  (If you didn’t check out Natalie Chanin before, let me just say that every stitch of her garments are hand sewn and meant to be worn.)  As long as I use good sturdy thread (perle cotton for this) and make sure I secure my ends, hand sewing can be stronger than sewing by machine.  This kind of stitching is also decorative because I chose to make the stitches somewhat large and in a contrasting color, but those pieces are going to stay together.

Cut then stitch?

Many people assumed that I had cut out the holes first and then stitched something behind.  It’s a lot easier to actually stitch first and cut after because everything stays nice and flat and the holes don’t stretch out of shape.  I did these shapes free-hand, but you could easily draw some light pencil lines as a guide for stitching.  I pinned the two layers of fabric together and used the pins to help me see where the edge of my yellow fabric was so I didn’t accidentally stitch off the edge.

 

27 February, 2014

Rain Storm: Silk screen, digital print, hand embroidery

2014-09-24T18:30:30-05:00Embroidery, Gallery Exhibitions, Spoonflower & Fabric Design|2 Comments

dripdropThis is my piece that is in the A Common Thread show at Textile Center this year.  It’s a 3 piece “suit” with three different techniques.  It started with the fabric for the skirt.  I taught a class last summer about silk screening and I needed a sample of how  you would create an all over repeat with silk screens.  This is two screens – one printed in dark silver and the other in blue.  So it took many passes to screen it to make sure that I wasn’t touching any of the wet paint where the edges of the screen might overlap.  I made the screens using a thermofax machine and specially treated fabric – you print your design on a laser printer or copier and run it through the machine with the fabric.  The coating on the screen is burned away whereever it touches your artwork.  It is a very cool process.  The fabric is a metallic denim and it is printed in metallic ink, so it is hard to photograph because everything reflects the light.  The pattern is a simple pencil skirt because I didn’t want to do much to interrupt the pattern.

The top is digitally printed “silky faille” which is one of Spoonflower’s newer fabrics.  I needed an excuse to get some and try it out.  The pattern is the same rainclouds from the silk screen, shrunk down and colored using the Spoonflower color chart.  The color chart is a piece of fabric printed with “chips” of about 1600 colors that can be printed.  Each one has a code, so you can choose the color you want and enter the code in Photoshop as you create your design. Since I had already printed the skirt fabric, I could compare colors on the color chart to the paint colors and get a pretty great match.  I forgot when I printed this that the pattern pieces are supposed to be cut on the diagonal grain for this top, but I wanted to keep the design running the same way as on the skirt, so I cut  it with the grain.  This is such a nice drapey fabric that it worked just fine.

The jacket is a simple bolero trimmed with a little blue organza around the collar and cuffs and then hand embroidered with rows of running stitch, matching the rain drops from the design.  I laid out the stitching lines with masking tape that I stitched along the edges of. The buttons are vintage ones I found on Etsy.

dripdrop2

12 November, 2013

The Thief

2014-09-24T18:30:51-05:00Embroidery, Gallery Exhibitions, Spoonflower & Fabric Design|Comments Off on The Thief

IMG_9462The Thief

2013

Digitally printed fabric with hand embroidery

This piece was my contribution to the art auction in my hometown.  They do a fundraiser every year with a silent auction of 8×8 inch pieces.  The artists are kept anonymous until after the event, so I have been keeping this one under wraps.

This is a collaboration with my mom.  She snapped this photo of one of her neighbor deer. This particular deer had been recently snacking at the neighbors pear tree so I made the repeat pattern behind her with pears and flowers.  I embroidered with shiny rayon thread to addd texture to her nose and ears and then gave her extra thick eyelashes.  I love the “who me?” expression that mom captured.

IMG_9465

28 November, 2012

Lichen

2012-11-28T19:09:46-06:00Embroidery, Spoonflower & Fabric Design|6 Comments

Lichen 1

October 2012, 8 x 8 inches

Digitally printed cotton, hand embroidery

I created this piece for the annual art auction at the art center in my hometown.  I donate a piece to their annual fundraiser every year.  There are not many fiber artists in the area that participate (many painters & photographers) so I am very proud to represent fiber art.  This started with a photo Andy or I took in Wyoming this summer when we were there for a wedding.  This beautiful stone was covered in many shades and shapes of lichens.  I printed it on sateen fabric, which really lets the details show up very sharply.  I then stitched my own clusters of lichens with about 6 shades of green threads and the chinese knot stitch to add some dimension.  I love this one and so I titled it “Lichen 1”, with the anticipation that I will do a few more from the other parts of the photo.

8 September, 2012

Embroidery 1 Class

2012-09-08T15:48:11-05:00Classes & Teaching, Embroidery|2 Comments

In just about 10 days I am teaching a beginning embroidery class at one of my very favorite yarn/fabric shops, Darn Knit Anyway in Stillwater MN.  This is our sample project for the 5 stitches we will learn in class.  I thought it would be fun to do a “cheater” crazy quilt block.  The block is 8 inches square and is Spoonflower printed fabric.  I printed tiny white dots right on the design so that you can basically “connect the dots” with the various stitches and the dots will help you keep everything evenly spaced and remember where to put your needle.  I made 3 different colorways (because why not?!) and the embroidery 2 class will have matching blocks with 5 new stitches to learn.  For this block we will do running stitch (and some variations), chain stitch & lazy daisy, back stitch, chinese knots and cross stitch.  Embroidery 2 is couching, satin stitch, blanket/buttonhole, fly stitch and feather stitch.

I stitched some polkadotted batik fabric around the edge of my sample and it’s now ready to be a pillow cover or a “mug mat” for my teapot.

18 April, 2012

Embroidery, &Stitches and more

2012-04-18T07:43:26-05:00Embroidery, Tutorials|1 Comment


The latest issue of &Stitches zine is available and I am a contributor! This issue is all about books: embroidery books themselves, book themed patterns, fun contributors (like Aimee Ray and Cate Anevski) and a couple of tutorials for some really neat stitches (Turkey stitch).  It’s a fantastic issue once again.

My project & article is all about teaching embroidery to kids.  I picked one of my favorite projects, “Poetry Pockets” that we have done with several groups of 1st and 2nd graders at the Textile Center and gave some tips for ways to teach embroidery to kids, like picking the right needle and thread.

Threading needles is always the biggest hurdle in teaching kids (or adults) to embroider, so I have a bonus tip for you, which I always show in my beginning embroidery classes: Making your Own Needle Threader.

You can get “needle threaders”, which look like a little bit of metal with a wire loop on the end.  You pass the loop through the eye of the needle, put the thread through the wire loop and them pull it back so the thread goes through the eye.  Great idea, but I can tell you from experience that if you put one of these in the hands of an 8 year old boy it will last about 13.5 seconds before it is completely mangled.

However, you can make your own needle threader for large-eyed needles (embroidery or chenille) out of a tiny slip of paper.  Just cut a piece of scrap paper about 2 inches by 3/16 inches.  Fold it in half.  Lay your thread end in the fold.  Now push the fold of the paper through the eye of the needle.  Easy! (And you can make more when they get mangled.)

Go to Top