12 October, 2015

Upcoming Class: Fabric Labels

2015-10-12T15:24:05-05:00Classes & Teaching, UpcomingClasses|Comments Off on Upcoming Class: Fabric Labels

Labels

On Monday October 19, I am teaching a class called “Digital Fabric Labels” at the lovely shop, Darn Knit Anyway.  It is a quick-and-dirty hands-on class focused especially on making labels for your handmade items.  This is great just in time for the holidays!  Make a quilt label with the name and date that you can stitch to your quilt; a care instructions label for your hand-knit sweater or even hangtags for when you want to sell your work.  You will learn the digital design skills to set up the file you need and then we will talk about ways to get it printed on fabric, paper, sticky vinyl and more.  This is a “beyond the book” class, based on a project from the Spoonflower Handbook.  We show a basic quilt label in the book and this class will show you variations and ways to adapt that idea to work for many different projects.  You need to bring your laptop for the hands on part, but otherwise there are no other materials you need to bring.

8 October, 2015

Class projects & collaborating

2015-10-08T17:27:17-05:00An Artist's Life, Classes & Teaching|Comments Off on Class projects & collaborating

I taught a really great class last night which was an intro to digital fabric design.  We talked resolution, we talked pixels, we talked formats & file sizes.  It’s basically a class to make you brave enough to go dabble and try something on your own.  My goal is to empower and inspire: to give you enough information that you feel confident enough to try and to give you some idea that is exciting enough to make you take the step and do it.  I hope that’s what happened for my students last night.  (It felt like a pretty inspiring and empowering night to me.)

Once we got through all of the vocabulary, we did a couple of hands on projects.  In this class, I like to do a collaborative fabric design where everyone contributes a piece and then we put it together, create a design, I order a yard and I mail everyone a swatch after class.  So you get a piece of fabric you worked on.  Sometimes I do a grid where everyone draws in a square.

lovegrid

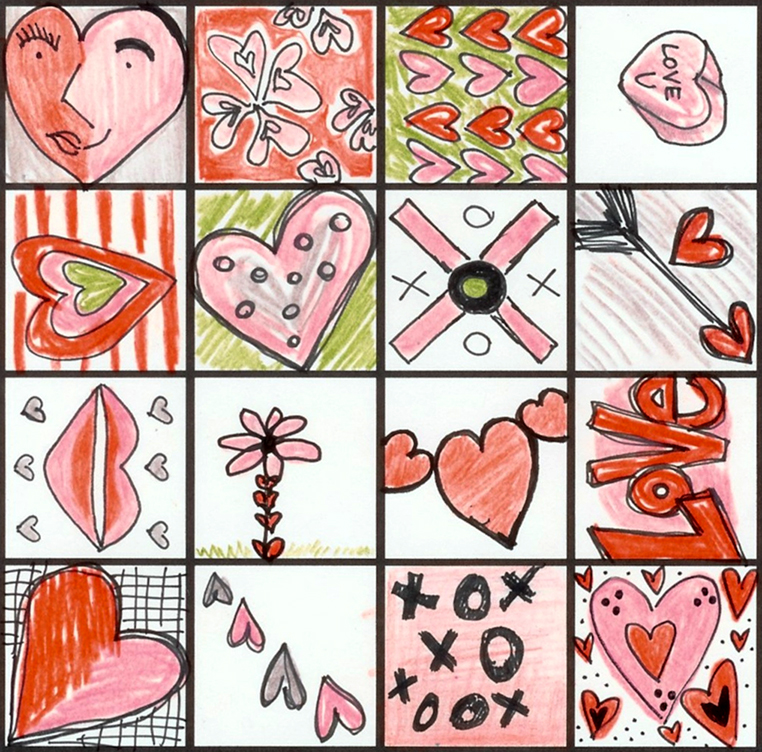
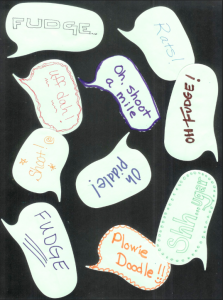
Sometimes we do a collage like this one with speech bubble shaped sticky notes and our favorite “clean” swear words.

Screen Shot 2015-02-05 at 9.47.06 AM

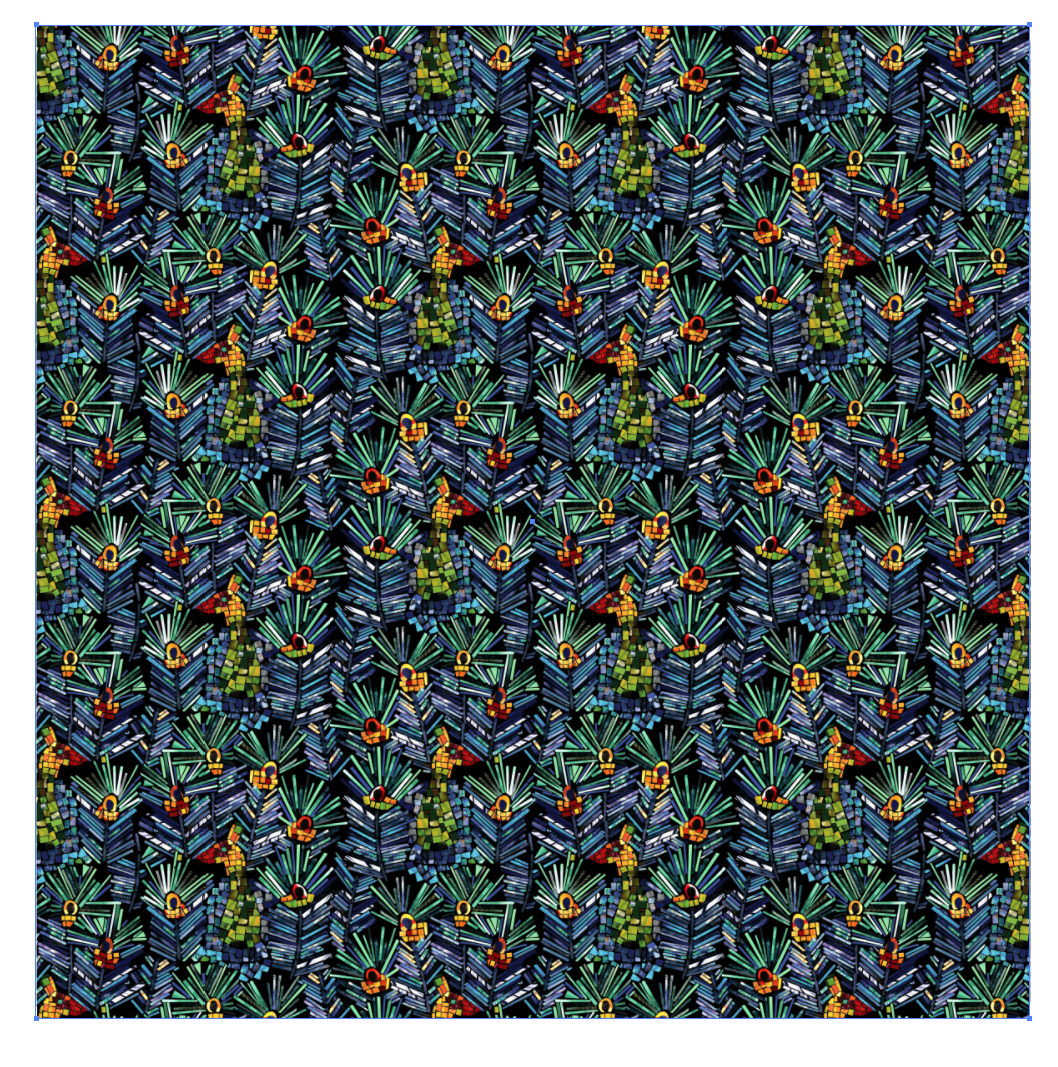
This time I decided to play with the Spoonflower weekly contest theme: microorganisms.  My class was skeptical.  I prepped a little ahead of time: I cut vellum paper to be microscope slides, we drew organisms, we added a sticker label to our “samples”.  I like to keep it small and simple so we don’t take up a lot of class time or trigger any “i can’t draw” anxiety.  Someone suggested a herringbone arrangement, which I thought was really fun.

Screen Shot 2015-10-08 at 2.23.23 PM

Screen Shot 2015-10-08 at 2.24.09 PM

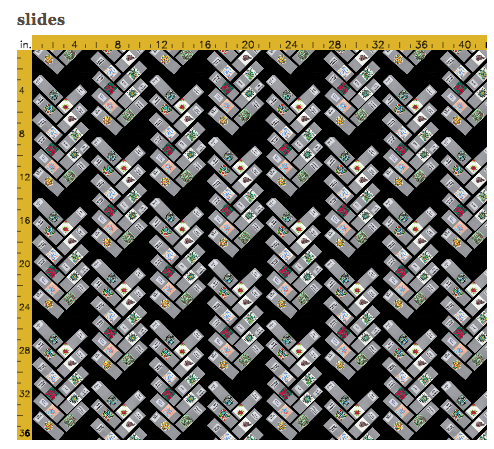
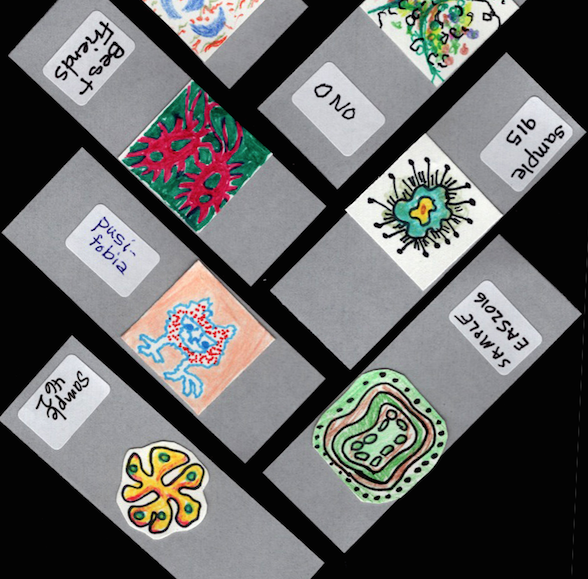
I think it’s adorable.  And funny.  And it got us many great lessons – how to scan, how to touch up & crop, how to upload and so on.  We did all the steps in class, looked at different repeats, discussed negative space and made a great cohesive design.  Score!

But one thing that made me think.  One student said: Do I have to?  What if I don’t want to make a microorganism on a slide?

I get it.

I totally get it.  Part of the joy of making things is that you get to do it your way.  That’s the bonus of making it through so many elementary school art classes (at least the ones I was exposed to). If you learn the skills of working with a paintbrush or using the scissors by making all of the “cookie cutter” projects, then you can take those skills and run with it.

I told her she had to make a microscope slide along with the rest of us.  And not because I needed everyone to be doing the same thing, but my goal was different.  I encouraged everyone to try things that they were interested in seeing the results of: use colored pencil if you want to see how that texture looks as you print it on fabric; outline in pen (or not) if you want to see what ink lines look like; try shading.  You have 1 inch to do your experiment.  We talked about ways to make a design cohesive.  Sometimes I limit the colored pencil colors so we have a specific colorway (the hearts design above), sometimes we have a theme like the post it notes.  These design elements all had the “slide” and the sticker shapes to tie them together, so we let that be the cohesive element.  We talked about how to arrange them (and the drawbacks to the pattern we chose), we looked at all of the repeat styles and the pros and cons of those as well.

On a personal level, I loathe group projects. (Who doesn’t?  Have you ever met anyone who says:  I sure love working on group projects?)  But as a teacher, we got to have a deeper discussion because we were all working on the same design and not 10 different designs.  We didn’t compare whose was better or more clever because it was ours, together and we were all equal contributors.

I once sat in on a seminar with awesome feltmaker Lisa Klakulak.  She was teaching a really basic wet felting technique and we each started a 3 inch square of felt, laying it out and getting the first steps done.  A few minutes in to the process, she had us pick up the piece and pass it to the person on our left.  The clamour!  No one wanted to hand over their precious piece and she made us do it anyway.  By giving away the ownership, we could focus on the technique.  The new piece that was handed to you was different.  You had to look and feel and analyze and think about what it needed next and think about what she had taught us.  After a few minutes, we picked them up and passed them again. Once that first shock had passed, the grumbling got much less.  At the end, we all ended up with a random swatch, made by many hands, but I learned so much.  I saw so many different versions and variations, successes and challenges. And there was no talk of “I’m not good at this” or “Mine looks dumb” or “Look at how pretty Lucy’s is”.  The discussion was instead about the process: “Look at how much smaller this one was, I wonder if it started with less fiber or those were just aggressive felters.”  The discussion moved away from “me” and on to the art technique.  I haven’t been brave enough to pull Lisa’s kind of a “trick” on a class, but I still think about it and how effective it was.


5 October, 2015

Upcoming Classes: Intro to Digital Fabric Design

2015-10-05T09:00:15-05:00Classes & Teaching, Spoonflower & Fabric Design, UpcomingClasses|Comments Off on Upcoming Classes: Intro to Digital Fabric Design

Screen shot 2011-08-31 at 8.20.30 AM

I forgot to do a little plug for this class earlier, but it’s coming up this week! Wednesday October 7 at 6 pm. You should still be able to register if you call Textile Center (online registration is closed).

Intro to Digital Design is just what it sounds like: a crash course in printing your own fabric.  We will make a collaborative design in class, scan and upload it and then you will get a swatch of that fabric later in the mail.  We will troubleshoot, talk about color matching, review some vocabulary (pixels, resolution, scale) and more.  It is the class to take if you’ve never designed your own fabric OR if you have dabbled a little but have questions.  I hope to see you there!

10 August, 2015

Upcoming Classes: Repeats

2015-08-10T21:52:11-05:00Classes & Teaching, UpcomingClasses|Comments Off on Upcoming Classes: Repeats

Just a quick note about a class coming up on Monday August 17 (that’s just 1 week!).  I have had a lot of requests for exactly this topic, so this class is really designed by you: creating seamless repeats from your artwork.  The idea is that we will take your art, whether it is a texture or a drawing or a painting and we will learn 4 or 5 different techniques for making it be able to tile seamlessly.  What does that mean?

Here is a pattern that is not seamless.  You can easily see the edges of each repeat tile.  It looks like a set of playing cards set side by side.

Screen Shot 2015-08-10 at 9.46.59 PMThis is the seamless version of that tile.  I copied and flipped the peacock and added in extra feathers so it disguises the edges of the tile.  You can’t see the edges of the rectangle, but it is still just one rectangle repeating over and over.

Screen Shot 2015-08-10 at 9.47.53 PM


This is a complex version.  We will try different techniques in class from really simple (mirrored repeats) to learning a tiny bit about the healing brush and clone in Photoshop.  You can register for class at Textile Center’s website.  Hope to see you there.


4 August, 2015

Upcoming Classes: New Classes this fall

2015-08-04T11:52:41-05:00Classes & Teaching, Spoonflower & Fabric Design, UpcomingClasses|2 Comments

waterlilyquilt

I am teaching a LOT of new classes this fall and I am really excited about that.  I am going to be one busy lady.

The waterlily is a sample for my Digital Art Quilt class.  It is one of the “Beyond the Book” classes that I am teaching, which are based on projects from The Spoonflower Handbook, but I am taking them a step further and adding some hands-on components.  This is based on a really cute quilt project from the book using an original piece of  collage art.  We are going to expand the collage idea by making paper collages, handpainting some papers and adding digital layers to the design as well.  This one is made only from the pages of an Eddie Bauer catalog and a sharpie drawing of pebble shapes.  I think I am going to print it at about 15 inches square and finish it as an art quilt.

Check out most of the fall classes here on my Upcoming Classes page.  I have a few more to come that are waiting to confirm dates.

12 June, 2015

Fiber Art meets Technology Reading List

2015-06-14T08:39:39-05:00Classes & Teaching, Everything Else|2 Comments

A close up of woven computer memory. So cool! (via drhart.ucoz.com)

I taught a “textiles & technology” class last night.  We had so much fun and we will definitely do it again!  Soft circuits, moldable plastic, thermochromic paint and a bunch more.  I told the class that rather than type all of these in a handout that they would have to try to type in to find them, I would just make their handout into a blog post.  These are a collection of recent articles and posts about textiles intersecting with technology.  Interesting reading and full of inspiration.

Core Rope Memory.  It’s like beaded ropes of wire that are actually computer programs. Completely cool.  This article also talks about an awesome woman programmer who worked on the Apollo mission computers.  So there’s lots to love.  Watch the video at about the 22 minute mark.  This article, also about core rope memory, has some amazing photos of the woven wires up close.  SO COOL.

Embroidery patterns translated to music.  I have a little music box at my house somewhere that you can use with punched paper like this.  I wish I could remember where I put it.

Not specifically textiles, but fascinating.  The museum in Prado is 3-d printing paintings so that people with visual impairments can “see” them.

A t-shirt that reacts to people nearby and tells you what you have in common.

A 3-d knitting machine that adapts a pattern to fit your size and shape.  I think any good knitter can do this, but it’s still an interesting article.

A scholarly article, but some neat ideas about all different kinds of soft/wearable circuits.

An interactive fur mirror.  Or one made of stuffed penguins.

Weaving with conductive thread and LEDs.

An iPad game based on a William Morris textile.

How textiles have revolutionized technology.

Google’s new Project Jacquard initiative.

The future of fabric.  Fashion design meets some new textile technologies.

Laundry that can clean itself?

A whole blog dedicated to fashion and technology.

Bring your multimeter to the fabric store?

A 3-d printed dress added to the collection at MOMA.

Electroluminescent wire.  Cool.

She’s a knitter.  She just does it with glass.

Patterned knits via a voice interpreting knitting machine.


Go to Top