

A Mini Tutorial: Spoonflower’s New Proofing Tool
Spoonflower recently introduced a new proofing tool that works right in your Design Library. I think it’s great! I made a mini tutorial video to show you how it works.

Spoonflower recently introduced a new proofing tool that works right in your Design Library. I think it’s great! I made a mini tutorial video to show you how it works.

I made a handful of these for holiday and graduation gifts this year and I wanted to share this fun idea! I ordered a swatch of Spoonflower’s peel-and-stick wallpaper a few weeks ago because I am thinking of updating a backsplash behind the stove in my kitchen. It’s currently wallpapered in peel-and-stick, which I did about 4 years ago and it looks awesome, but I wanted to change it up for something different. So, I ordered a swatch of this design by red_tansy but as soon as I got the swatch I realized the scale was too large for my tiny space. So I ordered another in a smaller scale.

But what to do with this leftover swatch? The answer for me is to make a book! I learned to make coptic sketchbooks a little more than a year ago at a class at the MN Center for Book Arts. I fell in love. These are fast to make and I love the exposed stitching on the binding. In our class, we tore the paper down from larger sheets which gives the pages a torn organic edge, which I also think is so pretty. I love all of the “imperfections” that make these really look handmade. I’m going to start teaching these as a class soon, but if you are interested in making a sketchbook like this, check out StoneBurnerBooks on YouTube. Her tutorials are fantastic.
The paper I have for the inside pages tears down beautifully to make pages for a book that is 4×5 inches, which is a nice pocket size. That also means that you need just a piece of wallpaper 5×12 inches to make the covers, which you can get easily from a 12×24 wallpaper swatch. The peel-and-stick wallpaper is durable and water resistant, which is ideal for a book cover. I know this is going to hold up to use.
If you’ve used Spoonflower’s peel-and-stick wallpaper in the past, they’ve got a new substrate in the last year and it’s very different than the previous one. I love it. Get a swatch! The new wallpaper takes a crease better and it is stickier than the previous version. It’s still removable if you use it on the wall, but that makes it even more usable for craft projects like this. Which is the way I use it most often.
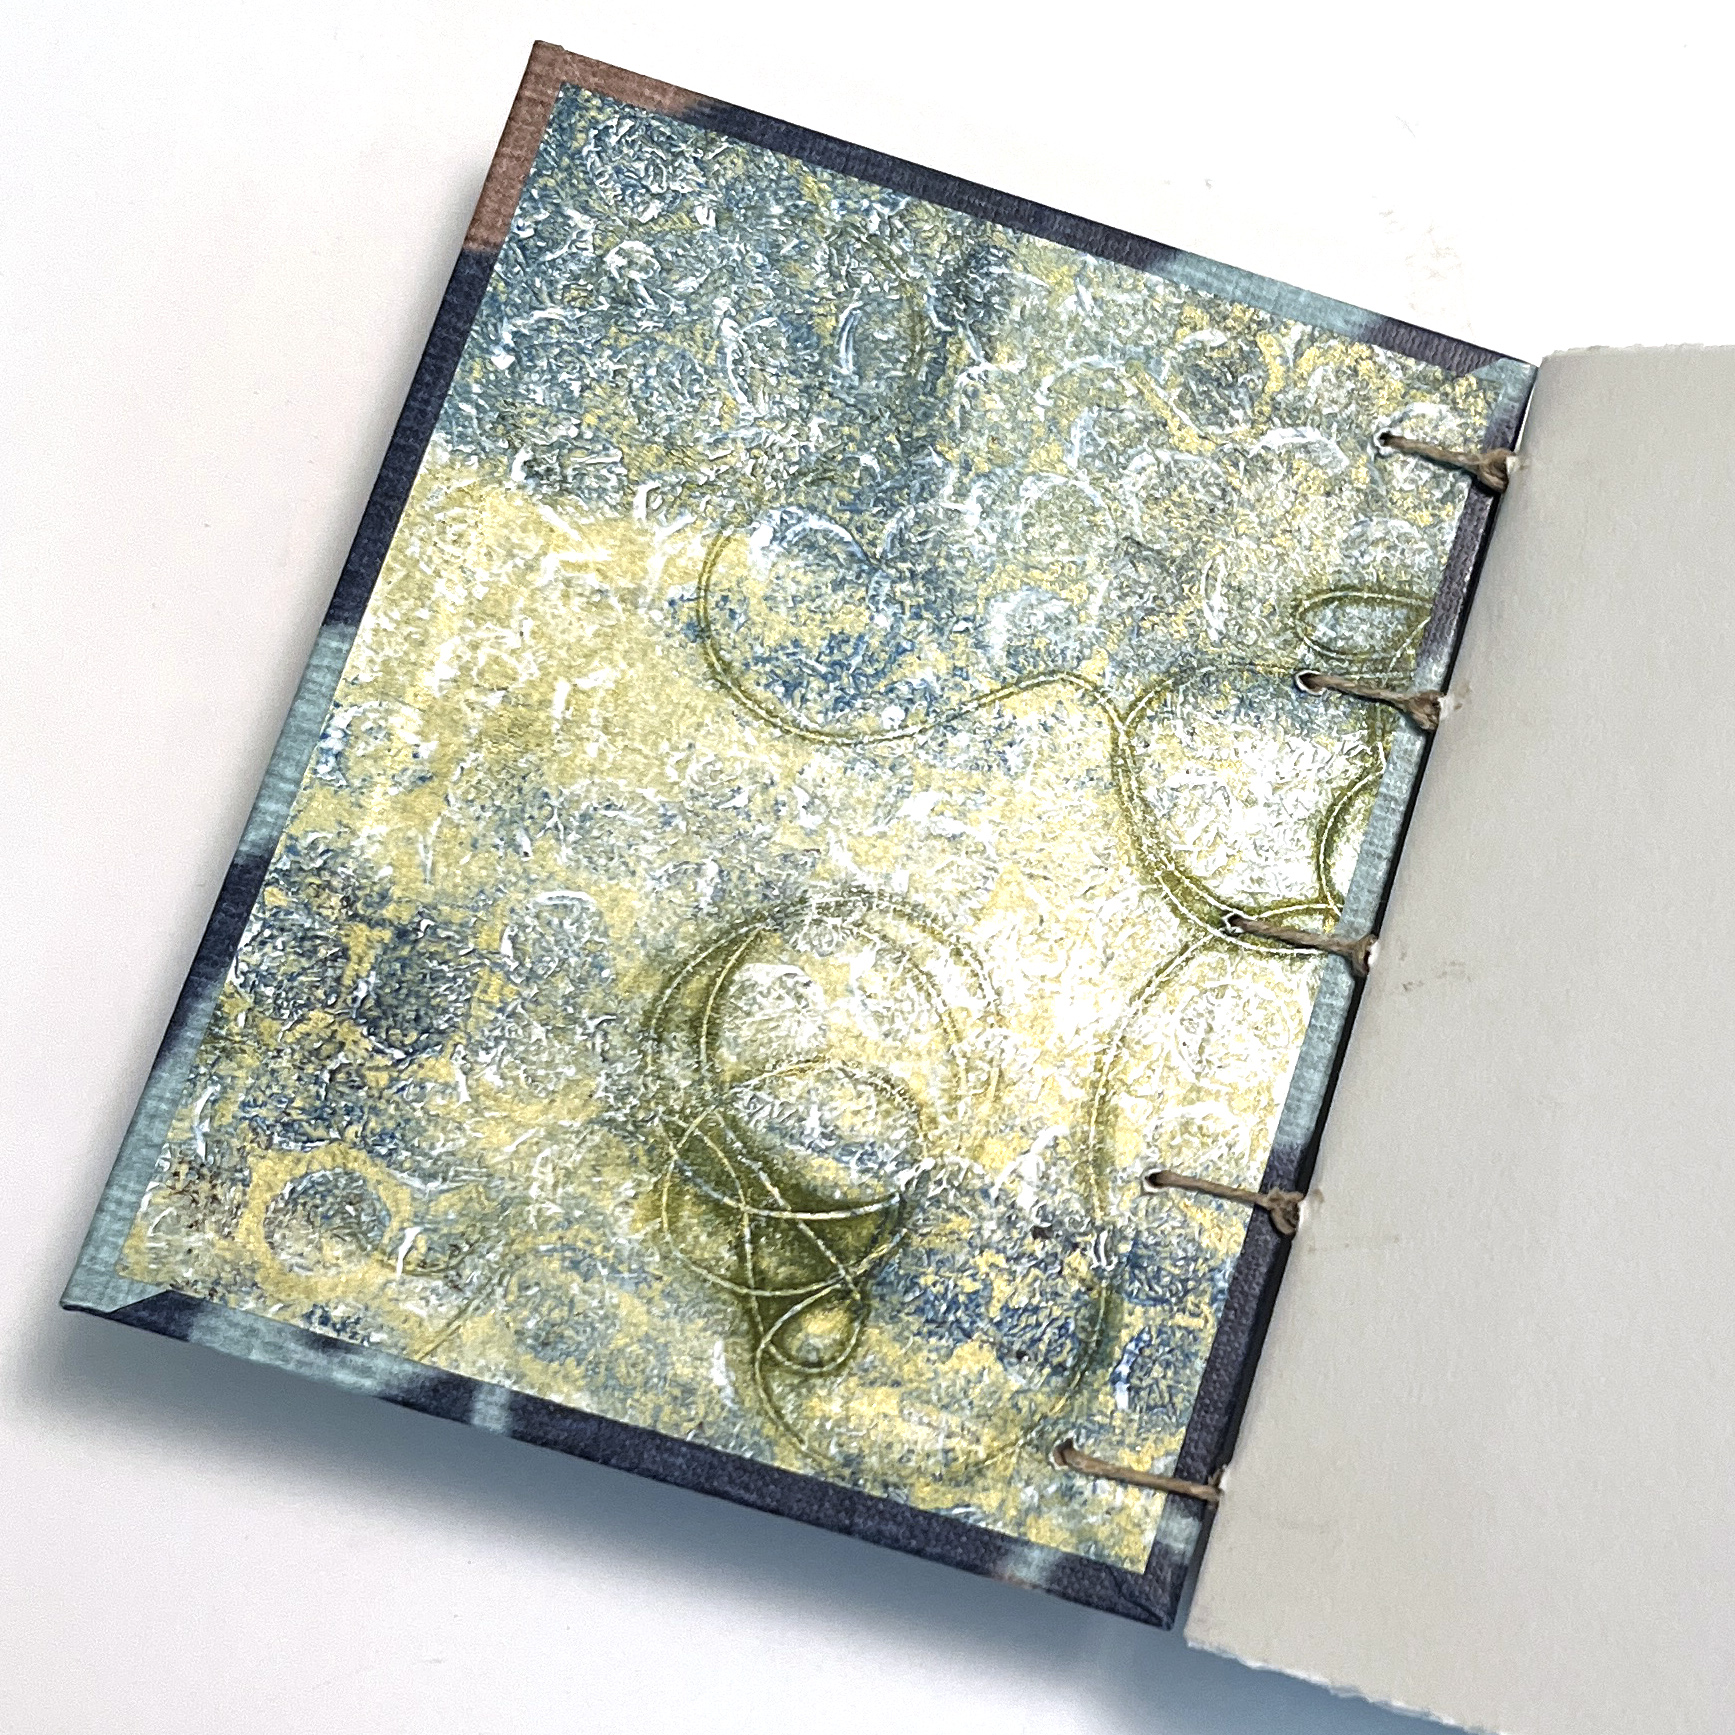
I made the covers from a lighter weight book board and wrapped the outside in peel-and-stick wallpaper. For the inside endpapers, I used a scrap of gelli plate printed paper that I just made in another class. The colors were so perfect when I saw it on the table that I had to choose it. The PVA glue I used for the endpapers sticks nicely to the wallpaper, so you don’t have to worry about it peeling up from that slightly glossy wallpaper surface. I let the glue dry overnight under weight to make sure the boards did not warp, but the whole book went together in just a couple of hours.
When I made these for holiday & graduation gifts, I scaled down several of my own designs on Spoonflower so they would be the right scale for a small book cover like this. That’s easy to do. And with one swatch I can make half a dozen covers easily.

Want to listen instead of reading?
A few months ago I ran across an article talking about Kraftex paper. If you’ve never heard of it, it’s like a heavy flexible paper, which feels a little like a cross between paper and leather. It comes in an unwashed version, which is stiffer like watercolor paper, and a washed version which has some flexibility and almost a drape, like fabric. I mentioned in my newsletter that I was super curious about it and a staff member from C&T Publishing reached out and offered to send me some samples to play with. I jumped at the chance!
Because I believe in transparency, I want to say that C&T didn’t ask me to review, post or promote anything in exchange for the samples. This is not a sponsored or paid post.
I’m dedicating some time this summer to both trying new things in my studio and practicing some new-to-me skills, so this morning I pulled out some of the washed Kraftex paper and decided to make a small notebook. I’ve been expanding my art practice to include more paper arts because I have found that it helps make my work more accessible when I am trying to do community projects. Fabric, and the tools needed to work with it, can be cost prohibitive and feel challenging for beginners, but paper is everywhere.

I started by tearing down some sheets of paper to make the pages for my book. This is some lightweight drawing paper and I made strips that were 3×11 inches. Tearing down pages was something I learned in a coptic sketchbook class I took recently from the MN Center for Book Arts. And although that seems like kind of a silly thing to want to practice, getting a consistent edge really does take some practice. I really love the look of a torn edge, so it’s something I want to get better at. It took just one large sheet of paper to tear down into smaller sheets for my notebook.

I cut the cover out of a piece of Kraftex paper with my rotary cutter and a ruler. This is the washed version in a color they call “Natural”. I loved how this one really looks like leather. It is about 1mm thick and very flexible. I really chose the size of my book to maximize the use of a piece of this Kraftex paper. It comes in 8.5 x 11 sheets or rolls, so I cut a strip 3×11 inches for the cover too. I folded each page and the cover in half to make a finished book that’s about 3×5.5 inches. The kraftex took a fold nicely and didn’t crack or warp like thick papers sometimes do. I think the Kraftex is going to make the perfect cover. It’s heavy enough to feel like a cover but not stiff or bulky.
I decided to use a decorative paper punch to create the holes so I could bind the book together. It was relatively easy to punch, but I should have made myself a jig so it was easier to line up the holes in the pages and cover. Something to remember for next time. This kind of a “ledger” binding just needs two holes near the folded edge and then you stitch and tie a sturdy thread through them.
I used a variegated cotton sashiko thread to bind the book together mostly because it was the first thing that caught my eye. Sashiko thread is like a very thin cotton cord and it worked just fine for this.

I thought it would be fun to add a little bit of something to the cover, so I used the same thread to stitch a couple of embroidery stitches. I punched the holes with an awl before I stitched because I didn’t want to crease the paper trying to punch the needle through it.

I have so many ideas for this! For my next project I want to try something with a little origami folding. There’s a technique to fold thicker papers where you get the paper wet before you fold it and I am really curious to see how that works with this and if I can make something interesting and three dimensional. Kraftex is also dyeable, so I am absolutely going to try shibori dyeing a couple of sheets. If you want to play with some, I think the best source for Kraftex is through C&T’s website. They have some great variety packs so you can get a bunch of sheets in different colors and they have dozens of free tutorials if you want to do a specific project.
It’s Stanley’s first birthday today. Make your own origami labrador party favor to celebrate with us. You just need a square of paper. It should be about 6 inches and it’s the most fun if it’s a different color on each side. You can use origami paper, wrapping paper, tissue, scrapbooking paper, or recycled magazine pages.

I’m not really a home decorating kind of person, so when Spoonflower introduced a new Grasscloth Wallpaper, I was intrigued to know what it was like, but it was pretty unlikely that I was going to be inspired to wallpaper parts of my house. So I decided to think about another project I could do with wallpaper. I have been very slowly working on a “Book Arts Certificate” from the MN Center for Book Arts here in Minneapolis over the past couple of years. I’ve loved book binding, marbling and paper making and have not really loved the letterpress because of major ink fumes and inaccessibility (I can’t really do it at my house.) But I love working with paper.
So I decided to make a pamphlet book. I am woefully un-expert at all of the vocabulary of book arts; there is a LOT. But basically a pamphlet book is sheets of folded paper, stitched together to make a binding, with a heavier paper on the outside for a cover. With my sewing background, I love sewn bindings. So I ordered a swatch of grasscloth wallpaper in one of my designs and decided to use that as my cover. When it arrived, it was rolled up and wouldn’t lay flat, so I unrolled it, slipped it under the heavy cutting mat that sits on my desk and let it flatten out for several days.

Grasscloth wallpaper is like a woven fabric backed with paper. It has a warp and weft that is very prominent, making its iconic texture. One set of threads are heavier than the other, which gives it a rib like texture. On the sample you can see at the top, the heavier threads are running parallel to the selvedge (that unprinted edge of the wallpaper sample) or horizontally across my design. This is the sisal or the grass in grasscloth. The threads running the other way are much thinner. As a wallpaper, it has a really rich looking texture. It has a very matte finish and feels like a piece of art paper when you run your fingers across it.
The first experiment I did was to see if I could fold it because I needed to make at least one fold to make the spine of my book. It folds much better parallel to those heaver threads than if you fold across them. They are brittle, so they crack rather than folding. So I decided I needed to keep that in mind when I was cutting my cover. That meant that I needed to rotate 90 degrees so that my fold and the heavier threads were going the same way. It doesn’t really matter on this design, but you’d have to keep that in mind with a more obvious directional print.

One thing I noticed right away when I unrolled my wallpaper sample was that the edges felt a little fragile. It was easy to catch the fibers and peel them up from the backing. If it was glued flat to a wall that wouldn’t be so much a problem, but for a book cover it wasn’t ideal. I decided to bind the edges of the cover like you do with a quilt by wrapping a narrow strip around them. I tried a fabric tape I had and some simple 1/2 inch strips of white tissue paper. I didn’t have any in green, but I think that might have even kind of disappeared into this design. I made a couple of little samples and decided that I liked the way the tissue paper didn’t add any bulk to the cover, so I decided to go with that. For this one, I used gluestick to attach it to the cover. I think next time I would use a brush and some PVA (Elmers) glue because the glue stick was drying so fast, it was a challenge to get everything lined up and stuck in place. I stuck it to the back and then folded over to the front of each edge of the cover. I burnished it down with my bone folder to make sure it really stuck well to all of the bumps in the paper texture. It works great and traps all of those cut ends so nothing is rough or catching.

Finally I used the bone folder to score the cover and carefully fold it in half. I added the pages, which I made from some lightweight drawing paper, and used an awl to punch holes through so I could stitch the binding using some perle cotton thread. It makes a great paperback journal! I’m going to put mine under a heavy book for a couple of days to really set the fold so it doesn’t pop open. If you want to try one like mine, I cut my papers and cover to 9×6 inches and the strips of tissue paper were 1/2 wide and I trimmed them to length after I glued them. Here’s a really simple tutorial on how to make a pamphlet book like this. In the photo with the book cover open you can see the back of the wallpaper, which is a nice plain white paper. It comes without any paste on it, so you don’t have to worry about it getting wet or sticky, which makes it a better choice for a project like this than the Smooth Wallpaper that comes pre-pasted. I will probably be able to make 4 books like this from the 24×12 inch swatch I got. It was really fun to see if this would work and I think it makes a beautiful book.


I thought it might be really appropriate to start off with a “How it started; How it’s going” kind of meme to talk about photography. When I first started making my art to sell or to show at gallery exhibitions about 20 years ago, the first and worst stumbling block was getting good photos. I had a camera, but I had no experience in what it took to get great photos of objects and I absolutely couldn’t afford to hire someone to take photos for me. So I needed to learn how to do it myself. This was before Etsy was really around, so there weren’t a bunch of tutorials to help you or recommend photo white boxes that were easy to find. (Wow, I am making myself feel old!) So everything I learned was by trial and error and I mean LOTS of trial and error.

The felted dragon shown up above was one of the first photos of my art that I found when I went digging through my photo archives. This is the photo straight off my camera. You can barely see the little guy because the image is so dark. I thought a plain background would be best, so I draped some white fabric behind it but it’s really wrinkly and not really professional looking at all.
Things I learned: You always need more light.
LIGHT. Light is the answer to nearly every photo dilemma. This is absolutely the one thing that made the most difference to my photos. My very first photo setup was to put objects on a table in my guestroom and masking tape a piece of white muslin up behind them. I had four utility shop lights that I got from Home Depot and I put the brightest bulbs in them that they were rated for. I clipped them on the back of a folding chair so I could aim them at whatever I was photographing. The photos still looked a little dark, but I could usually fix them in Photoshop to make them a little better. They weren’t amazing photos, but they were pretty good and it worked for me for a long while. It was a struggle to photograph some things, so I started to look for something that would help.

I did a lot of searching around for a light box because that was something people were recommending on Etsy. I found a folding plastic white box called a “Foldio” with a strip of LED lights that were attached to the top edge of it. It ran off of a 9V battery. It was brand new, just off a Kickstarter campaign. The Foldio has gotten much fancier and more powerful than the one I had; some of the new ones look awesome. But that original basic model really gave my photos a serious upgrade. The bracelet above is a beaded silk cuff and these were best sellers in my Etsy shop for a while. That photo is also straight off the camera without any edits.
Things I learned: Ditch the fabric.
One of the things I learned when I had the Foldio is that a sheet of white posterboard or craft foam is 100 times better than a piece of fabric as a background. Paper doesn’t have wrinkles and no matter how many times I would iron that piece of fabric, you still saw wrinkles and folds. Now I have both large sheets of white foam core and a big roll of white paper that I use as the background for everything in my studio. The bonus of using white versus another color as a background is that white reflects light. So effectively it’s like adding more light to your scene and more light is always helpful.

The problem with the white box was that I really couldn’t photograph anything larger than a loaf of bread because it wouldn’t fit into the box. And I started to make larger pieces that needed much more light again. One solution was to take things outside. If I could get a bright overcast day, photographing pieces against a piece of white paper taped up to my house worked great. This bag (made by my friend Pat Grady) was something we needed an image of for a postcard at the art center I worked at. So I took it home, dressed up in this cute ensemble, and my husband helped me take this photo using natural light. You can see we had to do some Photoshopping still to make it work, erasing the seam in the paper and so on.
Things I learned: Use a reflector.
For bigger items it helps a lot to have a big white surface to reflect extra light back on to the scene. For this shot, we had a big sheet of white foam core that we propped up on a chair to help get more light on the bottom of the scene where it was a little shadowy. You don’t see the effect with your eyes very well, but the camera can totally see the difference.

Natural light works amazingly well, but let’s be realistic. I live in MN and there is about one day in every month that has the right combination of bright, overcast, no snow, and not windy to be able to take photos. And especially with an Etsy shop, I can’t be limited to hoping I can take photos once a month. So, we borrowed some lights from a co-worker to get this shot (above). We set it up in the corner of an office, taped up a piece of white paper and had a couple of really bright lights and one big light with an umbrella on it to light up the whole scene. We thought we’d try out his set up and see if maybe we needed to buy some lights like this. You can see there is still some Photoshopping that had to happen, but this turned into a pretty great photo.
What I learned: The larger the item, the more light you need.
Getting a whole person lit up evenly from head to toe takes a lot of light. I realized that if I wanted to continue to photograph my garments, I was going to need to invest in some photo lights. We started looking at the free-standing umbrella style lights that you could buy as a kit on Amazon. We talked about painting a corner of our unfinished basement bright white to use as a giant sized white box.

Here’s the part where we got lucky. A friend of ours who is an artist and photographer decided to downsize his studio and gave us some hand-me down equipment in exchange for us helping him with his website. Best trade ever. Instead of reflector lights, these are strobes inside big fabric boxes which are like a giant camera flash. We have two and you can see them in this photo. The large one is to the left and the smaller one is behind me. On the right hand side you can see sheets of white foam core that we are using to reflect light to that other side. This was a photo that we staged for an event at the art center where I worked where they were giving me an award and needed a photo of me for the invitation. I wanted to show off the skirt without it being a photo of my face and so we came up with the idea of doing a parody on the Magritte “Son of Man” painting. You can see the final photo up at the very top of this post.
Our setup is a Speedotron kit similar to these. (You can also find them used like we have.) It’s amazing. I photograph nearly everything in my basement studio with these lights. I say nearly everything because for things that I post on social media, that’s still a piece of white posterboard next to a window with the camera on my phone. Because that also works amazingly well. And using this pro equipment is a little bit of a process. I have a checklist taped to the wall downstairs so I turn on everything in the right order. And I never remember the settings on the camera so I have a cheat sheet for that too.

Other than the lights, our studio isn’t fancy. We have an unfinished basement (which I LOVE) and we have about a quarter of the space dedicated to photo equipment, mostly because I use it often enough that it’s nice to not have to get it out and put it away all the time. The backdrop is a roll of white paper that we roll up when it’s not needed. I’ve upgraded to wider paper since this photo was taken so I don’t have to Photoshop out that seam all the time. We have a shelf that holds all of the clips, clamps, dress forms and props that I use for photos and a stack of large sheets of foam core to act as backgrounds and reflectors. This is where we take most of our annual Halloween photos as well. This one took a lot of creativity to get this mood lighting just right.

You’ll notice that I haven’t even mentioned the kind of camera I have. That’s because having an expensive or super fancy camera isn’t necessary for great photos. I take a lot of photos for things like social media and all of the instruction sheets for my Etsy kits with my iPhone because it’s small and convenient and does a great job. When I shoot things in the studio, I have a Canon 60D which we got in about 2010 and it still works super well. We got a couple of upgraded/specialized lenses that are for specific tasks like shots for my Etsy shop (24mm pancake lens).
I’ve also talked a lot about Photoshopping, but really you don’t need to have Photoshop either. I did when I first started out because I couldn’t quite get the photos I wanted. My goal with photos now is to get it right in the camera so I never even have to open it in Photoshop. That saves so much time! It took me a long time and a lot of learning to get to that point, but I can now do an entire photoshoot of new designs without anything but minor touchups. It’s not hard to learn, but you have to be willing to take a lot of photos and try new things until you get something you like. There’s no one cookbook recipe for how you need to photograph your work; everyone has different items with different challenges. I still get it wrong sometimes and have to go back and move lights around and try things set up in different ways.
I wrote this post because I friend said “You should write something about your photo setup; you always have great photos of your work.” and I wanted to show that there’s a lot of behind the scenes work to make it look that way. Hopefully this will give you an idea of where to start if you want to try learning how to photograph your own work too.